How fast, or efficient, are you in CAD? Employers typically want drafters that are quick and correct. Clients want drawings quickly and accurate. Some times it is difficult to get both, but that is the goal we strive for.
So, how fast are you? Why do you work at the speed you do? Is it because you have a lightning fast computer? Is your mouse super efficient? Does your CAD have cat like reflexes?
A good way to reduce your time spent drafting is to reduce your "Clicks and Picks." The number of mouse clicks, the number of mouse movements will increase/decrease your drawing time. Find a way to click less. How? Set up standards, templates, toolpallets, blocks, dynamic blocks, and osnaps.
Two ways to use osnaps that will greatly reduce your clicks and picks are with tracking and the "snap from" snap. These two functions will reduce the need to create, edit, remove temporary construction lines.
Pages
▼
Wednesday, August 29, 2007
Tuesday, August 21, 2007
On/Off or Thaw/Freeze - What's the difference?
Good question. There are differences, but they are subtle. The most common use of these commands is to make data invisible but retain it in the file. Both methods will accomplish this.
Off/Freeze Similarities: Is not visible, does not plot,
Differences:
On/Off - Is hidden in 3D, is still regenerated when off, will zoom extents to OFF layers, off a layer a block is on only items on that layer in the block are invisible
Thaw/Freeze - Can thaw/freeze per viewport, will zoom extent to thawed layers, freeze layer a block is on the entire block is invisible
There may be more, but this is the basics. The main differences again are; you can thaw layers per viewport, you can't turn them off per viewport. If a layer is off, it will be off in every tab and every viewport.
If layers are off, AutoCAD still regenerates them, though there is nothing to see. Not so much of a problem anymore, but why regenerate invisible lines?
If layers are OFF, and you ZOOM EXTENTS, those layers are still included in the "extents". But if they are "frozen", then you zoom extents only to what is visible.
If you use a block that has uses layers in it, and insert it on a different layer, when you freeze the insertion layer the entire block is invisible. If you turn off a layer, all layers used in the block that are on a different layer will still be visible. Example: I have a block with a layer in it called blue, and a second layer called green. I insert the block on layer red. If I freeze layer red, the block will be invisible. If I turn off the layer red, I will still see the entire block. If I freeze or turn off layer blue, then only the objects on layer blue will be invisible.
WOW!! That's confusing. It is easier to do it yourself than to read about it. Try it out and let me know what you discover.
Monday, August 13, 2007
I just had an article Posted from AUGI Hotnews. Here is a link:
http://www.augi.com/publications/hotnews.asp?page=1578
The article talks about the need for the training in drafting skills for CAD technicians. Is it valid today? I think so.
Enjoy
http://www.augi.com/publications/hotnews.asp?page=1578
The article talks about the need for the training in drafting skills for CAD technicians. Is it valid today? I think so.
Enjoy
Thursday, August 9, 2007
Trim and Extend Dimensions
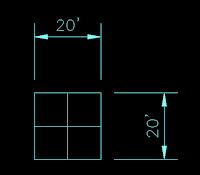
 Did you ever have a need to adjust a dimension quickly? You can with the trim and extend commands. Here's how: The image shows a box that is 20' x 20'. What I want to show are the dimensions from the edge of the box to the center. I could delete the dimensions and reapply. Or, since I used associated dimensioning like a good boy, I can reassociate the dimensions. Both methods take several steps. In this case all I really need to do is to apply the TRIM command.
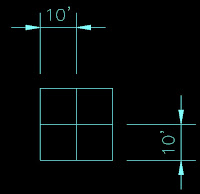
Start the trim command, select the center lines of the box (or the lines you want to dimension to go to), enter, then select the dimension. it will "trim" to the center line.
 They will then look like the second picture. In the case that I started with the dimensions to the center lines of the box, but want them to the outside edges, I would activate the EXTEND command. Select the lines I want to dimension too, enter, select the dimensions and they will move to the outside lines.
It's a nice little trick that will help out from time to time.
Wednesday, August 1, 2007
Clean your Files or your Grounded!!
When I receive files form a client, vendor, or coworker, I often ask why? Why what? Why did they leave one million extra and unused layers in the file? Why are there unused blocks in the file? WHY? WHY? WHY? Oh the humanity!!!
I ask CAD users around the office to take a few steps when they finish working in a file in order to make things easier for others when they have to come behind us and fix what we did wrong. Here are the steps:
1. Audit. Run the Audit command to fix many errors that could cause AutoCAD to crash. Runt the Audit command. When prompted to "Fix any errors detected", type in "Y" for yes. If errors are detected, a prompt will appear asking if they are to be deleted. Type in "Y" for yes, as this is why we are doing this.
2. Purge. When using the purge command, select the "Confirm Each Item to be Purged" box and the "Purge nested items" boxes. This will allow the user to eliminate all purgeable items in the file with one click. If unused items might be needed in the future, then select the purgeable items one at a time. It can be cumbersome, but saves items that you might want.
3. Zoom in or out in the file so that the drawing border fills the screen. Then save. This will allow for any thumbnails of the drawing to clearly indicate the contents of the file.
These steps will keep files clean, neat, and tidy.
