While you were working in AutoCAD and were using Annotated Text, (available since AutoCAD 2008), have you ever noticed that after you save the file, you can't manipulate it anymore? It's some sort of "glitch". I have found that if you close the file and open it again you can once again move, rotate, delete, etc. once again. Until you save the file that is. This is very annoying to me because I have developed the habit of saving nearly every five minutes or so (I have trust issues with the autosave and my battery back up!)
Note: Anonymous (I'm not sure who you are but thanks!) left a comment on this post saying that he/she would run the AUDIT command and make sure that you press Y (meaning yes) to make sure that any errors are fixed and that will allow you to edit your annotated text again. I tried it out and it works great!! Keep the tips and comments coming! Great work
Happy CADDING
Tuesday, April 29, 2008
Quick TIP - Open an Xref
In AutoCAD, you can open a file that is referenced into your drawing file very quickly, even if you don't know what or where the file is. In your working file, select any part of the xref'ed file, it could be a line, text, or any object. Right click, then select the OPEN XREF option. This will open the referenced file.
Very quick and easy.
Or, open the XREF Manager. Select the desired file and right click. Then select the OPEN option and there you go.
Happy CADDING
Very quick and easy.
Or, open the XREF Manager. Select the desired file and right click. Then select the OPEN option and there you go.
Happy CADDING
Monday, April 28, 2008
Vote For Me to Teach at Autodesk University 2008
Well, CAD-a-Blog has taken off quite well so far. It has gone so well that I submitted FOUR class ideas to Autodesk University 2008. Autodesk has these ideas along with several hundred other class ideas submitted by other people. If they choose my ideas then I will be an instructor at Autodesk University 2008! How great would that be? Autodesk will review the ideas they received and choose the best ones. There is only so much room at the Venetian Hotel in Las Vegas. Evidently they have some of the choice in the hands of their users. They have given us, the users, the chance to pick our favorite 15 classes that we want to attend at Autodesk University. They have posted every class on a website and sorted them by category. You can go and vote in one or more categories up to 15 classes.
I ask that everyone of you go and vote for the four classes that I offered. PLEASE!!?!?!?!?!
The classes are:
- CAD Management and IT – Create and Maintain a CAD Manual
- Education and Training – How to Train Your Users
- Education and Training – Keeping Up With CAD
- Design Visualization – Impression for the Artistically Challenged
So, to get to the voting area, follow this link: AU Vote
Choose the classes you would like to see, even if they aren’t my class ideas.
Thanks for your help, and Happy CADDING.
Thursday, April 24, 2008
AutoCAD 2008 & 2009– Scale List Clean UP
AutoCAD – Scale List Clean UP
How annoying are the annotation scales that just fill your list like crazy? The list gets so big that it fills your screen and you can’t find the scale you want to! It’s awful. AutoCAD 2009 now has a prompt to help this out. You can turn off the scale list from referenced files if you don’t want to see them. This isn’t full proof, however as the file can still fill up all on its own.
Autodesk has released an add on (a patch if you will) that can run in AutoCAD 2008 and AutoCAD 2009 to clean up the annotated scale list.
The scale list patch will available at Autodek’s Support Site soon (tomorrow they say):
http://support.autodesk.com
Here is an overview as taken from Shaan Hurley’s blog:
Description of Problem
When a file contains excess scales, performance may be negatively affected. Eventually, the file may become unusable. To use the file, some scales must be removed. This utility repairs affected files by removing excess scales.
NOTE: Nested external references (xrefs) may produce excess scales. To correct this problem, install AutoCAD 2008 Service Pack 1 or corresponding service packs for AutoCAD-based products. The Scale List Cleanup Utility repairs files affected before the necessary service pack was installed.
Affected Products
· AutoCAD® 2008-based products, including DWG TrueView™ 2008
· AutoCAD® 2009-based products, including DWG TrueView 2009
Installation Instructions
To install the Scale List Cleanup Utility
This utility has to be installed in the AutoCAD 2008 or AutoCAD 2009 installation folders.
You must have administrative privileges on your Microsoft® Windows® operating system to complete installation.
1. Based on your operating system (32-bit or 64-bit), download the appropriate self-extracting executable file.
2. Select a folder.
3. Extract files to the selected folder.
4. Navigate to the folder and copy CleanupScales.exe, CleanupScalesRes.dll, and CleanupScales.html to the installation directory of your AutoCAD-based product.
NOTE: To run this utility you must launch CleanupScales.exe from the installation directory of your AutoCAD-based product.
Repair Affected Files
To repair affected files
1. Close all affected files. Open affected files will not be repaired.
2. Launch the Scale List Cleanup Utility from the installation folder of your AutoCAD-based product.
3. Under Files to Clean, select affected files.
4. If desired, select Maintain Visual Fidelity for Annotative Objects.
NOTE: This option allows you to maintain visual fidelity for annotative objects when they are viewed in AutoCAD 2007 or earlier releases and corresponds to the SAVEFIDELITY system variable. Annotative objects may have multiple scale representations. When you select this option, annotative objects are decomposed and scale representations are saved (in an anonymous block) to separate layers, which are named based on their original layer and appended with a number.
5. Under New Scale List, in the drop-down list, select a scale list template.
NOTE: Each scale list template contains a different scale list. When you run this utility, unused scales are deleted from files and the scale list from the selected template is applied.
6. If desired, change the scale list threshold.
NOTE: The scale list threshold determines the minimum number of scales a file must contain in order to be repaired. The default scale list threshold is 50. Files that contain fewer scales than the scale list threshold will not be repaired. To change the scale list threshold, on the New scale list panel, enter a number in the Scale List Threshold field.
7. Click OK. Repaired files are saved in the same format last saved in.
Subscribe to CAD-a-Blog
Several readers of CAD-a-Blog already subscribe to it's feed or e-mail alerts. Other readers have found us by accident, or word of mouth, or more accurately, word of shared links! This is great, I welcome everyone to the blog. Come early and come often. Leave a comment, send me an e-mail, I love to hear from you.
If you are interested in receiving alerts and feed notifications whenever a blog entry is posted, use the items below to sign up. It's free, it's easy, and there are lots of great tips about AutoCAD, Impression, and designing in general. So jump on board CAD-a-Blog. Sign up today.
Happy CADDING
 Subscribe to CAD-a-Blog in a reader
If you are interested in receiving alerts and feed notifications whenever a blog entry is posted, use the items below to sign up. It's free, it's easy, and there are lots of great tips about AutoCAD, Impression, and designing in general. So jump on board CAD-a-Blog. Sign up today.
Happy CADDING
Subscribe to CAD-a-Blog in a reader
Wednesday, April 23, 2008
AutoCAD 2009 – Color Change – WHY?
I can’t tell you why the background color of AutoCAD 2009 was changed to white, but it is. You can change it back to black, or any color, very easily. Open your OPTIONS window (type in OP at the command line) and go to the DISPLAY tab.
Click on the COLORS button near the center on the left of the window. A new dialog box will come up. At the TOP on the LEFT, there will be a box called Content. Select (it will highlight when you select it) the 2D MODEL SPACE option. Then near the center of the window, on the interface element OPTIONS, select the UNIFORM BACKGORUND option. Then, on the top right of the screen, there will be a COLOR option box. Click on the arrow to bring up a list of colors. Pick the one you want (I chose black).
That is how you switch your colors, for anything. Play with the options and see if you can come up with a better color solution.
Happy CADDINGAutoCAD 2009-Extended Tooltips
More information is great, the first few times you need it. But once you have learned what the command does, the advanced tooltips simply get in the way. A common occurrence is to work on something, leave your mouse at one spot for a few seconds only to have the information you are trying to read and use covered up by the tooltips. This is very annoying. How do you deal with this?
There are a few options. This is AutoCAD, where everything can be customized (mostly anythin g.) If you open your configuration dialog (type in OP at the command line) and go to the DISPLAY tab, there is a button you can push to turn tooltips off. That’s great, no more interference. However, there are no more tooltips either.
If you want the tooltips, but not the Advanced, or Extended, tooltips, there is a button to turn only those off. This may be the compromise you want. You get the tooltips, but not the giant window of tooltips covering your work area.
A third option and one I suggest you try, is to set the time AutoCAD 2009 waits to show the extended tooltips to a high number. Its default setting is 20 seconds. Set it 45 or 60. Try it out until you find a number you can live with. Tweaking this setting will allow you more time to keep your mouse still but still call up the extra data if you want it. You might find that this will allow you to get that extra little help you need every once in a while, but yet keep your screen open and friendly.
I hope this helps.
Happy CADDING
Tuesday, April 22, 2008
Should I upgrade to AutoCAD 2009?
That is the million dollar question now isn’t it? Not only for AutoCAD 2009, but every time a new release comes out, especially when they are yearly. The times a new release came out after two years of waiting it was easier to jump into it (for some reason).
It is my professional opinion that no release has ever been a “must upgrade.” I don’t feel that there is an absolute reason to upgrade every release; even if you or your company is on the subscription plan.
I do feel, however, that it is in the best interest of a company to upgrade every other release. My suggestion to everyone that asks this question is to get on the subscription plan and upgrade at least every other year. Go ahead, make the argument, why pay for something and not use it? Because it is cheaper to buy a release and pay for the subscription every year than it is to buy the release every other year. Plus, if you upgrade every other year then you are essentially keeping up with AutoCAD. You will never be more than one release behind, which in my opinion is acceptable.
To answer the question at hand, I honestly can’t say (in my opinion) that upgrading from AutoCAD 2008 to AutoCAD 2009 is a must. But I can say that if you are running AutoCAD 2007 or later, then it is a good idea. There are enough features between two releases that justify an upgrade.
Another idea is to look at the DWG file types as a release, and the others as an update or patch. The latest are the 2004 and 2007 types. The 2004 type is covered in releases 2004, 2005, and 2006. The 2007 types are 2007, 2008, and 2009. I assume that release 2010 will be a new DWG type. Instead of upgrading every release or every other release, perhaps every third release is an option. Up grade at the last release of every type, that way you have all of the options available for that DWG type. This would be a good reason to upgrade to 2009 and then essentially wait until 2012 to upgrade again. You will start to get a little behind, but I feel that it is still acceptable. And, if you are on subscription, it is still cheaper to buy it every year than to pay the full price every three years. Beyond three releases it isn’t cheaper.
This might not answer the question at hand, but I feel that it is really a much deeper and more involved question than simply upgrading to AutoCAD 2009 or not. Until Autodesk provides a release with a feature, or feature set, that will absolutely enable you to make more money, then there will never be a reason to upgrade to a single release. You and your company have to look at “the big picture.” The bottom line is that you need AutoCAD to either produce design drawings (as a service) or to produce drawings that enable you to create something to sell. Can you do that with your current software? Will the new release improve production efficiency more than it will cost? That last question is the killer.
Consider all of these concepts and come up with a plan that suits the needs of your company and its budget. Then you will be able to answer the question, do I upgrade or not?
Thursday, April 17, 2008
AutoCAD 2009 - Find and Replace, no zoom
It has been brought to my attention that when using the Find and Replace function in AutoCAD 2009, that you can not actually go to the text you find. While in the function, 2009 zooms to that object automatically. When you end the Find command, it zooms back to where you were when you started.
This means that you will have to FIND (automatically zoom to within the command), make your changes within the Find command, then close.
It used to be that when you zoomed to text in the find command you could then close the function and be where your text was. Evidently not any more.
But you can edit the text right there within the find command, just not anything else.
The automatic zoom is a nice feature, but I really want to end up where I am editing my drawing at. Follow me here? What is happening now, is that I have no idea where it was that I changed my text!! It could have been anywhere.
Keep this in mind when you use the find replace command.
Wednesday, April 16, 2008
Impression – Update CAD Geometry
One of the best features of Autodesk’s Impression, is the ability to update the geometry of the drawing. In this Impression Tip, we will discuss how to update the drawings linework, instantly (or pretty close to it) and keep the rendering styles intact. Try redoing a drawing by hand!
You started off with a great CAD drawing. You imported it into Impression and you used FILL STYLES to render it. It looks great, your best work ever. BUT!!!! The client called, and needs the drawing changed, for whatever reason. Does it really matter why? Nope, you have to deliver. Impression can do that.
I recommend saving your first file and working from a copy of it. That way, when your client (or boss as it often is) changes his (or her) mind you haven’t lost a thing. Anyway, just update the cad file and your done. I know, not much of a tip. How do you UPDATE the cad geometry?
Go to the FILE pulldown menu item. Go to the UPDATE CAD GEOMETRY button and click it. Now you have a choice. You can pick from these three options: entire file, sketches, or layers.
Picking the entire file option will update, well, the entire file. You might not want that, so you have more options. The sketches option provides a list of the different line work and annotations that are available in the drawing file. This list will also include blocks. The layers option will provide a list of the layers. Choose the layers you want to reload.
A dialog box will appear, regardless of the method you choose, that will provide a list of the available items to pick from. Choose wisely!
If you made your drawing using layer styles, and each layer has a style, then the update should go pretty smoothly with very little re-doing of anything. Assuming that is that the cad linework was done with closed polylines. If you rendered your Impression file using fills, then again, assuming you have anchor points for those fills in every proper spot, then you will have little rework to do. Now, please understand that having this happen, meaning having little to no work to do, is a rare thing. Typically the lines move enough so that several of the anchor points are not in the right place. That’s ok, because it won’t be as if you have to redo the entire drawing!
Happy CADDING
Tuesday, April 15, 2008
Impression – Fill Anchors
Here is another Impression Tip and Trick to remember about fills. We talked about the different Impression Fill tools already, but one thing I left out was AREA Fill Anchors.
Fill Anchor Points are the insertion points for fills. Where this point is placed has special significance when you update the CAD geometry. The anchor point will refill the area around it according to the fill style previously used. You can also move a fill by moving the anchor point. If you filled the wrong area, that’s ok, click and drag the anchor to the new area.
If you don’t want to see the anchor points, you can toggle them on and off. Go to the menu bar, go to DISPLAY, click it, and then turn the AREA FILL ANCHORS toggle on or off. If it is on there will be a check mark in front of it. Sometimes turning this off helps to see the drawing better, especially if you have several small areas to fill right next to each other.
Earlier I mentioned that area fill anchors will refill an area when you update the cad geometry. That’s true, but it isn’t perfect. Sometimes it doesn’t quite work out just right, especially if multiple anchor points end up in one area. Double check it just to make sure. Even though it isn’t perfect, it sure beats redoing the work every time the line work in a project is updated.
The different fill tools produce different types of anchors. The Fill Points will produce an anchor that is, well, a point. The line and freehand fills will produce, well, lines, just as you drew them. The Area Fill Window will produce an anchor that looks like the crossing window. The anchors are permanent fill tools. This means that when the geometry is updated, it reads these anchors just as it would read you inputting them at that moment.
This is just another reason why Impression is a great tool that enables users to create digitally rendered drawings.
Monday, April 14, 2008
Impression – Fills
Autodesk’s Impression is a program that allows users to digitally create visually enhanced color drawings. Impression’s main method to accomplish this is the FILL tool. Impression 2 really improved the fill application.
There are several ways to add a fill style to an object. The main method, I guess it’s the main method because it is the default setting for fill, is the AREA FILL POINT tool. This fill tool will apply a fill to a single defined area, or shape. The user selects a point, the fill point, and the fill will, well, fill until it comes to linework. If there is a square, it will fill the square. If the shape is some type of polygon, it will fill the polygon. You get the idea. This method works great for filling shapes, one at a time.
AREA FILL LINE. This method allows the user to fill multiple objects at a time. Draw a line and every object it intersects will be filled, similar to a crossing window in AutoCAD. Actually it is more like a fence line in AutoCAD.
AREA FILL WINDOW. This has two methods to it. It works just like a crossing window in AutoCAD. Drag a window from right to left to fill all shapes the window crosses. Drag a window from left to right to fill objects that are fully inside the window. These methods work great for filling objects close together with the same style.
AREA FILL FREEHAND. This method is similar to the fill line tool. The user draws a freehand polyline, essentially, having all shapes it crosses filled.
POWER FILL. I need more power Captain (said in a Scottish accent.) This tool will fill shapes that are similar, all at once! It looks for repeating areas that are bound by objects. Similar windows on the side of a building will all be filled with just one click.
There are many ways to apply a style in Impression; some give you more detailed control while others allow for speed. Choose which method suits your needs best for the task at hand.
Thursday, April 10, 2008
AutoCAD 2009 – Customize Ribbon Panels
The AutoCAD 2009 Ribbon panels can be customized. If you are familiar with the CUI, then this should be easy enough for you. If not, it is still quite simple. Let’s go.
 Open the CUI (type in CUI or right click a panel, toolbar, etc. and click the CUSTOMIZE item.) Make sure you are working on the workspace you want to customize. Scroll down the CUI until you get to the Ribbon Panels. Expand the Ribbon Panel list. Now you can edit an existing panel, or make a new one.
Editing a Panel. Expand the panel you want to customize. To remove an item in the panel, select it, right click and pick the remove option. To add a new (well, anything new really) panel, row, sub-panel, flyout, or separator, right click the panel name and select the item you want to add. To add a command, go to the command list, find the command you want to add, click and drag it to the desired location on the panel. Easy enough.
Creating a New Panel. Right click a panel, and then pick the NEW PANEL option. Name the panel and start adding your items just like you did when editing an existing panel.
Most of the items in a panel are pretty obvious, like Panel Separator. It provides a space that separates items in the panel. Flyout creates a flyout, similar to the flyouts in tool bars. A ROW, is just that. It provides a place for your commands to go. You can have one row or more, just add them. When adding a command to a row, drag it to the side of the row and drop it there.
Sub-Panels are a little different. A sub-panel has to go into a row. You can’t place them directly into the panel like you do a row. The sub-panel creates an area in a row to group commands in. Take a look at some of the existing panels to get a good idea of how they work. Sub-panels can have rows in them too.
When you are finished customizing your panel, make sure you put it in a TAB, otherwise it won’t show up anywhere in the ribbon.
Happy CADDING
AutoCAD 2009 – Customize the Ribbon
 How can I customize the Ribbon in AutoCAD 2009? Easy enough. Start the CUI. You can do this many ways. I suggest you type in CUI at the command line. Or, you can right-click anywhere on the ribbon and then click on Customize.
 Expand the CUI window, if it isn’t already. Activate the Workspace you want to customize the Ribbon for. Scroll down to the RIBBON TABS list. Each TAB is listed there. Here you can create a new tab, or edit the existing tabs. All you can really change here are the Panels that are in the tab.
Go to the TAB you want to edit and expand that list. To remove a panel, go to the Panel you want to remove, right-click it and select the remove option. To add a tab, scroll down to the RIBBON PANELS list. Find the panel you want to add, click and drag it to the proper tab and drop it. You can change the order of the panels by dragging them to where you want them. You can also change the order of the panels while working in AutoCAD, and not in the CUI. Just drag the panel tab to the location you want it to be in.
While you are in the Ribbon Tabs list, you can also duplicate a tab. Right click the tab you want to duplicate, and click the duplicate button. Ingenious concept right? Did you notice the COPY option when you right-clicked the tab? The difference between duplicate and copy are simple. Duplicate will make a copy of the tab and place it in the list. The COPY option makes a copy of the tab and places it in your clipboard so you can paste it somewhere.
That is how you customize the Ribbon tabs. Later on I will post about customizing the Ribbon Panels.
Happy CADDING!!
Tuesday, April 8, 2008
Impression – Blocks
Impression from Autodesk works a lot like AutoCAD. Of course they are not exactly alike, but they have similar tendencies and patterns. Let’s take a look at blocks. You can take a block made in AutoCAD and use it in Impression. You can stylize it once and use it again and again and again. See, just like AutoCAD. You can’t make blocks in Impression, but you can import them with a drawing or from the Block Library. By the way, Impression 2 has expanded the size of the block library. It is much better now.
How do they work? Well, they are just like AutoCAD blocks. They have lines, arcs, shapes, or whatever. They can also have fills built into them. Or you can just leave the blocks with linework on layers, or on the same layer. Use them however you need, it’s up to you.
If you have a block in a file that has been used more than once you can quickly stylize them. Edit the block, stylize it, and there you go. Every instance of that block will be rendered the same way, right away. It is a great way to get a lot of content into your drawing, and to get it done quickly. Each block can be scaled and rotated individually. But they are all stylized the same.
You can search for blocks in a file by filters. These filters will display a list of based on block type, name, saved blocks, blocks in use, and other criteria. Any block in use in a file can be exported to a block library. This library can exist on your machine or on a network.
As you can see, Impression blocks work very similarly to blocks in AutoCAD. Give them a try, they can and will save you time and effort.
Happy CADDING.
Quick Tip - Start up
The best and worst thing about AutoCAD is that any user can customize the software to work almost however the want it to. There are hundreds (this might be an exaggeration by the way) of ways getting something done. How I do it and how you do it are probably two different ways, or perhaps even more. This is good and bad.
It is nice that I can do things my way, but it is annoying when I have to go and help somebody with an issue and they want to do things their way!! All kidding aside, lets look at one of these settings.
How do you start a new file? Many of use use the QNEW command. While others use it to, they just don't know about it. What? I'd know if I used that or not. Clicking on the NEW icon in the STANDARD toolbar (or in the quick access tool bar if you are using AutoCAD 2009), invokes the QNEW command.
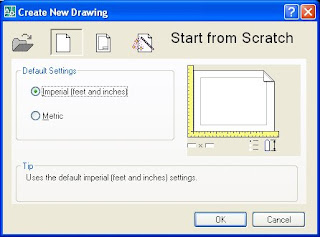 If yo use the QNEW command, you can assign a specific template file to be used every time. A real time saver. If you use the NEW command, then you get options. How are those options displayed for you? Do you get a dialog box allowing you to browse to a DWG file or a template file? Or do you get the Create a New Drawing wizard? I like the browser type functionality, others like the Wizard. Which is better? Neither. They both get the job done, just pick the one that suits your needs best.
The Wizard gives you these options: Open a Drawing, Start From Scratch, Open a Template, and Use a Wizard. the other lets open a file, you pick between DWG, DWF or DWS (DWS is a standards file in case you weren't familiar with the extension.) I don't want to start a file from scratch (typically) because I need my files to work with the rest of the company files that I work for. I need a template or an existing drawing. Others need to start from scratch often, so they leave this option available to them.
You can chose which method to use by changing a systems variable in AutoCAD. Don't worry, it is very easy to do, and there are only two choices. You can't mess it up. If you don't like it, switch it back. Ok here's how: at the command line type in STARTUP. There are two possible settings for this command, 0 (that's a zero not an "O") and 1. Set it to 0 to turn off the wizard. Set it to 1 to turn on the wizard. That's it. See, that didn't hurt.
I know I said that this is a QUICK TIP, but it really is, it just took me a while to get there. Perhaps next time I will write a fast tip. We'll see where that takes us.
Happy CADDING.
Monday, April 7, 2008
AutoCAD 2009 – Like it? Then PIN it
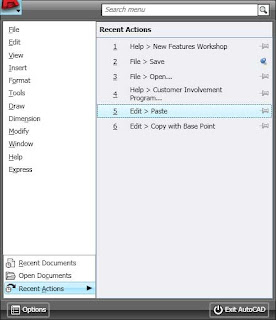 AutoCAD 2009 now has a PIN feature in almost every dialog box there is (keyword – almost). What do I mean by PIN you ask? Great question. In this instance, to PIN something, means to hold it in place in order to keep it visible. This is a process or feature that is popular in message boards on the Internet. Autodesk just brought it over into AutoCAD.
 Two questions: How do I PIN something and how do I know if it can be pinned? You guys (and gals) really ask great questions. My readers are the smartest readers on the net. I mean that. If something can be pinned, there will be an icon in that objects dialog box that looks like a pushpin. See image at the left:
In order to pin it, just click the PIN looking icon. To “UN”-pin it, click the icon again. Very simple.
If you want a file to stay listed in your menu-browser, just pin it. This is real nice when you are working on a particular file over and over again. Some dialog boxes will collapse, or partially collapse, but you can pin many of them opened. The Action Recorder is like this. Pin it open to see more of the recorded actions that were recorded.
You can pin the Quick View Drawings, or Quick View Layout images to stay opened if you want to.
Look for the pin, if it see it and you want it, click it. If you get tired of it (whatever IT is) click the pushpin looking icon again to close the item. Very simple, just like I like it.
Saturday, April 5, 2008
New Look
Well, out with the old and in with the new. I hope this post finds you all well. If you didn't notice, then, well perhaps I'll just come out and say it. CAD-a-Blog has a new look. I feel that it looks much better. Enjoy, and sorry about any inconvenience that might have happened through this update.
There are now direct links to our major topics. They are:
HOME - A link back to the main page
Articles - Takes you to posts about articles I have written
AutoCAD 2009 - Brings posts to you about AutoCAD 2009
Impression - Posts about Impression
STORE - A place where you can purchase CAD-a-Blog themed items, and other stuff too!
This list may be expanded (or retracted) in the future, so keep your eye on it.
As always, HAPPY CADDING
Thursday, April 3, 2008
Outsourcing-Friend or Foe?
I wrote a paper about Outsourcing about a year ago. I have had several people ask me about my thoughts and feelings about this topic lately, so I thought that maybe several of you also have these questions. Click on the link to take you to the paper OUTSOURCING-FRIEND OR FOE, to get an idea of where I stand. I did some research on the topic and I thought that my findings were interesting.
Let me know what you think.
Happy CADDING : )
Subscribe to CAD-a-Blog in a reader
Let me know what you think.
Happy CADDING : )
Subscribe to CAD-a-Blog in a readerWednesday, April 2, 2008
Impression – Styles

Styles are saved in the drawing (Impression file extensions are .IRF) they are created in. BUT, users can export them to a styles library for future use. This works great when working  on multiple drawings from the same project, or for working on different but similar projects. Just bring them in and apply the style as needed.
Styles are basically applied to a layer. In Impression 2 we have the autolayer feature. This will automatically assign items layers. You can add a style different ways, to a layer or to an object. The easiest way to apply a style to a layer is to select the style, click it, drag it and drop it on the layer you want it on. Very simple. Or, to change an objects style, select the object (a fill pattern for example), then change the style name setting to the layer you want. You can click and drag a style on top of an abject, but it will only add the new style on top of the old style. You might not want that. But this is a method to use to try and get unique effects, so keep that in mind.
Altering a style is simple enough. Select the style you want, and then make any changes you need or want. Save the file and add it to your library for future use.
Styles are the backbone of Impression. I suggest messing the settings just to see what you can do with them. I’ll get more in depth with them as time goes on.
Subscribe to CAD-a-Blog in a readerTuesday, April 1, 2008
CAD-a-Blog

Have you heard about Autodesk's Impression? Impression is in its second year, or second release. Autodesk named it Impression 2. Very creative name. Well, the first release (Impression 1) was available to anyone willing to pay about $500 per license. Now Autodesk has changed who can have it and how they get it. Impression is now only available as a FREE download for members of Autodesk's subscription services. If you buy a program without the subscriptions service you can no get Impression. Sorry. Autodesk has done this to sweeten the pot of Subscription.
Good news. If you have a subscription with Autodesk, then all you have to do is log on to Autodesk's subscription website, go to your download page and download Impression. You get one license of Impression for every subscription license you have.
So what does this mean? It means that you can now start using Impression. What is Impression? It is a digital illustration software. It can create digital renderings (not 3D realistic renderings) that have a hand drawn look to them. Take a look at the image on the side. I made this with Impression. I traced over a photo of the Chicago Skyline. That is supposed to be the Sears Tower by the way.
 The second image is of a generic movie house. As you can see, there are many different ways to use Impression and many different methods to use too. The first image was drawn completely in Impression. The second image was drawn in AutoCAD and imported into Impression where it was rendered. These are not great works of art, but many people have created great looking images.
CAD-a-Blog is going to start posting tips and tricks about Impression too, especially since there isn't much about it on the internet yet and now it is free. Many more users will now have it available to use and will want to take advantage of it, especially since it is free.
So, keep coming back to CAD-a-Blog to learn more about Impression. Until I get more posts about it, check out my articles on Impression in AUGI World magazines September of 2007.
If you want to be alerted when CAD-a-Blog is updated, sign up for either the free RSS feed or for the e-mail alert. When a new blog is posted these features will let you know. Just fill out the appropriate form below.
Happy CADDING (and rendering!)
Subscribe to:
Posts (Atom)