In AutoCAD 2009, we were given the Ribbon and the Action Recorder. The Action Recorder is great for recording repetitive actions and tasks. The Ribbon is great for accessing grouped commands and saving screen real estate. One of my readers asked me how to use the Action Recorder without using the Ribbon. Well, you can't. You can start recording, stop recording, and play back other Action Macros but you can not edit them. This is a big deal to me. If you have tried creating a macro to use, or for other people to use, they need to be edited.
When an Action Macro is created, every input is literal. That doesn't always apply when you need to reuse the macro. For example, an input point may not be at the exact same coordinates every time. Therefore you need to allow the user to choose the input time. You can't edit the action macros if you don't use the ribbon. I have come up with a workaround. Here it is:
Turn on the ribbon and minimize it. There are three options to display the Ribbon: Full Size (displays the ribbon and the tabs), tabs and panels (displays the tab names and panel names only), and tabs only.
Doing this will take up more screen space but it will give you access to the ribbon and the features that are only in the Ribbon. If you don't use the features in the ribbon enough to justify having it displayed that way, I understand. You can toggle the ribbon on/off by typing on the command line: RIBBON. That way you can create a macro with the Recorder and then edit it.
Its a pain I agree, but if you don't want to use the ribbon in your daily work, you will have to turn it on to use some of the latest features in AutoCAD.
Showing posts with label ribbon. Show all posts
Showing posts with label ribbon. Show all posts
Friday, January 16, 2009
Thursday, April 10, 2008
AutoCAD 2009 – Customize Ribbon Panels
The AutoCAD 2009 Ribbon panels can be customized. If you are familiar with the CUI, then this should be easy enough for you. If not, it is still quite simple. Let’s go.
 Open the CUI (type in CUI or right click a panel, toolbar, etc. and click the CUSTOMIZE item.) Make sure you are working on the workspace you want to customize. Scroll down the CUI until you get to the Ribbon Panels. Expand the Ribbon Panel list. Now you can edit an existing panel, or make a new one.
Editing a Panel. Expand the panel you want to customize. To remove an item in the panel, select it, right click and pick the remove option. To add a new (well, anything new really) panel, row, sub-panel, flyout, or separator, right click the panel name and select the item you want to add. To add a command, go to the command list, find the command you want to add, click and drag it to the desired location on the panel. Easy enough.
Creating a New Panel. Right click a panel, and then pick the NEW PANEL option. Name the panel and start adding your items just like you did when editing an existing panel.
Most of the items in a panel are pretty obvious, like Panel Separator. It provides a space that separates items in the panel. Flyout creates a flyout, similar to the flyouts in tool bars. A ROW, is just that. It provides a place for your commands to go. You can have one row or more, just add them. When adding a command to a row, drag it to the side of the row and drop it there.
Sub-Panels are a little different. A sub-panel has to go into a row. You can’t place them directly into the panel like you do a row. The sub-panel creates an area in a row to group commands in. Take a look at some of the existing panels to get a good idea of how they work. Sub-panels can have rows in them too.
When you are finished customizing your panel, make sure you put it in a TAB, otherwise it won’t show up anywhere in the ribbon.
Happy CADDING
AutoCAD 2009 – Customize the Ribbon
 How can I customize the Ribbon in AutoCAD 2009? Easy enough. Start the CUI. You can do this many ways. I suggest you type in CUI at the command line. Or, you can right-click anywhere on the ribbon and then click on Customize.
 Expand the CUI window, if it isn’t already. Activate the Workspace you want to customize the Ribbon for. Scroll down to the RIBBON TABS list. Each TAB is listed there. Here you can create a new tab, or edit the existing tabs. All you can really change here are the Panels that are in the tab.
Go to the TAB you want to edit and expand that list. To remove a panel, go to the Panel you want to remove, right-click it and select the remove option. To add a tab, scroll down to the RIBBON PANELS list. Find the panel you want to add, click and drag it to the proper tab and drop it. You can change the order of the panels by dragging them to where you want them. You can also change the order of the panels while working in AutoCAD, and not in the CUI. Just drag the panel tab to the location you want it to be in.
While you are in the Ribbon Tabs list, you can also duplicate a tab. Right click the tab you want to duplicate, and click the duplicate button. Ingenious concept right? Did you notice the COPY option when you right-clicked the tab? The difference between duplicate and copy are simple. Duplicate will make a copy of the tab and place it in the list. The COPY option makes a copy of the tab and places it in your clipboard so you can paste it somewhere.
That is how you customize the Ribbon tabs. Later on I will post about customizing the Ribbon Panels.
Happy CADDING!!
Tuesday, March 11, 2008
AutoCAD 2009 Application Window

AutoCAD 2009’s biggest change is the user interface.
We spoke AutoCAD’s new Ribbon and the new Menu Browser, but I want to step back a bit, and take a look at the new Application Window. The Application Window (I didn’t realize it was called this) is what you see when you are using AutoCAD (see screen shot above.) It has the drawing area, the status bar, the ribbon (in 2009), the info center, menu browser, quick access toolbar, etc. Whatever there is to work with it’s in there.
Out of the box, AutoCAD 2009 looks very different because of these changes. One of the first things you might notice is that the toolbars are missing and it appears the pull down menus are gone or at least changed. The ribbon has replaced these items. It has also replaced the dashboard! If a user types in the command “DASHBOARD” to try and bring it up, the ribbon opens (if it isn’t already.) So, no more dashboard either. If you find that you can’t work without toolbars or pull down menus, change your workspace to “AutoCAD Classic”. This will turn off the ribbon, bring back the pull downs and open toolbars. If you want the ribbon back, just type in dashboard (or ribbon) at the command line. I suggest you try to get through the change by working with the ribbon. It does reduce screen real estate.
Another change is the Menu Browser. I talked about this earlier. Since the pull down menus are now separated into the Ribbon and the Menu Browser, each one is better suited to give you more. They take up less room and have more abilities than their predecessors. One of the greatest advantages with the new menu browser is the ability to PIN recent documents, commands and more. We didn’t have that before. It makes repetitive work easier to get to.
I plan on looking at more of the new features in AutoCAD 2009 in the next several posts.
Happy CADDING!!
Monday, March 3, 2008
AutoCAD 2009 Menu Browser
In one of my first posts about AutoCAD 2009 (screen shot) I discussed the addition of the Ribbon. That post discussed the changes made in AutoCAD 2009’s user interface, at le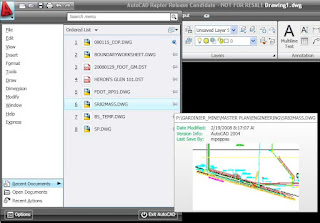 ast the most obvious change, the Ribbon. I went back to re-read it and noticed that I finished it by saying the next post will talk about the Menu Browser. I never did post about it. Sorry. I know the suspense is killing you. Today I would like to end your agonizing wait and talk about the Menu Browser.
 ast the most obvious change, the Ribbon. I went back to re-read it and noticed that I finished it by saying the next post will talk about the Menu Browser. I never did post about it. Sorry. I know the suspense is killing you. Today I would like to end your agonizing wait and talk about the Menu Browser.
If you look at the screen shot provided, look for the giant red A in the top right hand corner. If you have worked with the ribbon on the Office 2007 products from Microsoft, this concept will be familiar to you. Office 2007 has a Microsoft Windows logo in the top left hand corner of the screen. This icon is where you can get to more menu items. In AutoCAD, the giant red A is very similar. Click it to open the Menu Browser.
Before clicking this, you might have searched and searched for the pull down menus. They are now in the Menu Browser within the big red A (the big red A reminds of the novel, “The Scarlet Letter” where those convicted of adultery were forced to where a giant red, or scarlet, letter A on their clothing.) If you love using the pull down menus then click the A to bring up a host of menu items. On the left will be a list of the possible menus. The gold old-fashioned, file, edit, view, insert, and more are there. At the bottom of the list there will be the additional menu items of recent documents, open documents, and recent actions. The menu items are nothing new, and neither are the recent and open documents options. The recent actions option is a nice addition. This will provide a list of some of the major actions that you preformed in AutoCAD. There is also a feature that works throughout the Menu Browser, called Pinning. Clicking on the icon that looks like a pushpin will lock that item in place. This can also be done with the recent documents menu option. A user can PIN a particular drawing to the list so that it won’t disappear after opening many other documents. This helps to aid in the quick access of files that are frequently accessed.
At the top of the menu browser there is also a search box. This allows the user to search the CUI for specific or important items. Actually, the items don’t have to be important at all, jus there. Start typing in the LINE command. The menu browser will then start to filter the options to contain only those with the word LINE in them. Click on the displayed command in the Menu Browser to execute the command. Nice!!
There is a preview guide in the Recent Documents menu item that is customizable. The files can be displayed in list form, icon form, or image form. And these too have options like small, medium or large. The list form can be ordered by list, date, or type.

This new interface structure retains many old and familiar methods of view and interacting with data. It also adds new features to familiar settings that can improve the way we work within AutoCAD.
Happy CADDING!!Thursday, February 14, 2008
AutoCAD 2009 - Screenshot
The biggest change is the interface. command line users, you won't really care. What I mean is that if yo type i your commands, then the change will affect you less. Those users that take advantage of tool bars, pull down menus, and the dashboard, well, you will see a huge change. Here is a screen shot of AutoCAD 2009, out of the box (except that I changed the background to black, it comes in white.)
As you can see, there are no tool bars and the pull down menus are gone. In there place is the RIBBON. If you have used Microsoft Office 2007 then you will be familiar with the ribbon concept. AutoCAD's ribbon works virtually the same, except that it can be customized. It can be collapsed, docked, undocked, the tabs moved around and more. The dashboard is completely gone. If DASHBOARD is typed in at the command line the ribbon will turn on. It isn't even listed as a topic in help! The poor dashboard was only here for two releases. The ribbon is really the dashboard, but on steroids. Autodesk chose to call it the ribbon to keep a familiarity between different software packages.
How is it used? The ribbon is really a combination of the pull down menus and the tool bars. By the way, tool pallets are still here, thank goodness. In case you were worried, the display screen is still there, it is turned on/off in options. (I haven't used that menu since release 12 in DOS.)
Out of the box, there are six groups of TABS to choose from. These work similarly to the pull down menus of old. Each group has different tabs, which act like tool bars. The ribbon is collapseable, and the tabs have fly outs. Each tab can be pulled out and placed anywhere on the screen (just like toolbars.) They can be put back too. Users can create new tabs or modify any existing tab through the CUI.
To allow for more screen realestate, the ribbon can be minimized. The groups and tabs can be accessed by hovering the cursor over the desired group or tab. It can also be undocked and placed either horizontally or vertically any where on the screen. If two monitors are being used (like me) then the ribbon can be put on either screen.
The ribbon takes some getting used to, especially for those that have customized their menus, or for those that live for toolbars. After a while users seem to get used to the ribbon .
The next post will take a look at the MENU BROWSER, and the big red A.
Happy CADing.
Subscribe to:
Comments (Atom)