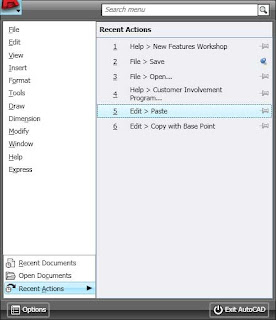
A reader recently asked me how to get the layout tabs back in AutoCAD 2009. He had been using the Quick View Layout (or QVL for short) but wanted to use the tabs again. In some cases tabs are quicker and easier to use. I agree. The QVL are great when you want a preview of the layout. Well, here's how:
Open up OPTIONS. To do that, type on the command line OPTIONS. (caps don't matter by the way.) Go to the DISPLAY tab, then to the bottom left of the screen to the LAYOUT ELEMENTS area. Make sure to Check the box that says DISPLAY LAYOUT AND MODEL TABS. That will turn them on.
You can use either method of moving through the tabs i your drawings. Even if the tabs are on, you can still use QVL. If you don't like either of these methods, you can toggle through your tabs by pressing CTRL+PAGE UP (or PAGE DOWN). CTRL+Page Up takes you towards the first tab, while CTRL+Page Down take you toward the last tab.
Showing posts with label AutoCAD 2009. Show all posts
Showing posts with label AutoCAD 2009. Show all posts
Monday, March 23, 2009
Friday, January 16, 2009
Using the Action Recorder without the Ribbon
In AutoCAD 2009, we were given the Ribbon and the Action Recorder. The Action Recorder is great for recording repetitive actions and tasks. The Ribbon is great for accessing grouped commands and saving screen real estate. One of my readers asked me how to use the Action Recorder without using the Ribbon. Well, you can't. You can start recording, stop recording, and play back other Action Macros but you can not edit them. This is a big deal to me. If you have tried creating a macro to use, or for other people to use, they need to be edited.
When an Action Macro is created, every input is literal. That doesn't always apply when you need to reuse the macro. For example, an input point may not be at the exact same coordinates every time. Therefore you need to allow the user to choose the input time. You can't edit the action macros if you don't use the ribbon. I have come up with a workaround. Here it is:
Turn on the ribbon and minimize it. There are three options to display the Ribbon: Full Size (displays the ribbon and the tabs), tabs and panels (displays the tab names and panel names only), and tabs only.
Doing this will take up more screen space but it will give you access to the ribbon and the features that are only in the Ribbon. If you don't use the features in the ribbon enough to justify having it displayed that way, I understand. You can toggle the ribbon on/off by typing on the command line: RIBBON. That way you can create a macro with the Recorder and then edit it.
Its a pain I agree, but if you don't want to use the ribbon in your daily work, you will have to turn it on to use some of the latest features in AutoCAD.
Monday, September 8, 2008
FREE AutoCAD Navigation Tool
YES ITS FREE!! Autodesk is providing its users with a free navigation tool!
The new tool (did I mention it's free?) allows for forward and backward navigation inside of AutoCAD. It acts much like the forward/backward navigation within a web browser.
It is like a zoom previous, but more intuitive.
I am told that this navigation tool works in AutoCAD 2008 and in AutoCAD 2009. It integrates with the ribbon in 2009, of course.
You can get this NAVIGATION TOOL at the Autodesk Labs web site. The Labs has a ton of free and up-and-coming things. Impression got a start here, as well as Inventor Light,and other add-ons.
Thursday, July 17, 2008
Poll Results-Autodesk release Cycle
CAD-a-Blog conducted a readers poll (completely unscientific of course) to see how often you think Autodesk should release a new version of AutoCAD. This seems to be a hot topic at the moment due to many users unhappiness with AutoCAD 2009.
Here is what you said:
Out of 45 readers participating (I know, not that many) nobody wanted a 6 month cycle. I don't even think this is possible unless there is only one item to the update.
2% of the voters would like to see an 8 month cycle!! That's fast, and again, I'm not sure that's possible either.
4% wanted a 12 month (or yearly) cycle, which Autodesk has done since the 2003 release of AutoCAD 2004. It would seem that most people are unhappy or not fully satisfied with this type of a cycle.
13% would like to see an 18 month cycle which would be every year and a half, or two releases in a three year period. They would like to see Autodesk take a little bit more time to work on the program.
49% of the voters would like to see a 24 month, or bi-annual release of AutoCAD, that's almost half.
31% of users participating said a 36 month or three release cycle is the way to go. Is that too long of a wait?
-------------------------------------------------------------------------
Well, this pole is clearly not scientific, or far reaching enough for us to make any conclusions about the users. However, it does seem to coincide with other polls and discussions on the internet. It seems that keeping up with AutoCAD every year is becoming a hassle for many of its users, managers, and companies.
How long before this rapid release cycle takes a big enough toll on companies where they stop upgrading every year? there are many problems with a yearly release cycle on the users end, cost is the biggest, or course. Everything comes down to the bottom line. Autodesk has to serve not only their clients, but their stockholders. In fact, the big guns in charge at Autodesk answer first to the stockholders. The stockholders answer to their desire for valuable stock. In order to affect change in the stockholders perspective, the stock has to change value. The more profitable it is the more they will stay the same, and more of it. The less valuable it is, the more likely they are to change policy.
My point here is that everyone involved is in this thing to make money. Autodesk wants to make money selling the software to users. Users want to make money selling drawings, models, etc. by using the software. Perhaps the best question to ask is what do the user's clients need? That will dictate what the users will purchase and how they will work and for how much. Which will in turn direct Autodesk on what and how to produce in their software.
Sometimes the software provider, in its interest, has to create a need, hence the verticals of AutoCAD. Many users didn't know that they needed new and improved software to do their jobs until it was available. It's like color TV. Nobody knew the needed it until it was available. they were happy with black and white TV.
That's my two cents, please don't ask for change!!
Happy CADDING.
AutoCAD 2009 - Service Pack 1 (it's about time!)
Autodesk has released Service Pack 1 (or SP1) for AutoCAD, AutoCAD LT, and other products.
I know that many CAD-a-Blog readers have discussed issues with the FIND command and its lack of "zoom to" features. Essentially when you used the FIND command, and did a "zoom to", then closed the find command, your screen would return to a previous state, and not on the object you zoomed to. Well, this service pack fixes that, even though it isn't stated in the README file. So, rest assured that this feature now works properly!!
To get the file, go to this Autodesk Service and Support page. The download and instructions are there. Make sure you read the README file. It will tell you what has been updated, how to install it, how to uninstall it (you never know), and more.
Here is a partial list of topics that were updated in this patch:
- 3D Visual Styles
- Annotation Scaling
- External References (xref) palette
- Raster Images
- Partial Open
- Plot
- Properties Palette
- Hatch
- Remote text (rtext)
The following defects have also been fixed:
.NET API
Annotation Scaling
Attributes
Blocks
Export a Layout to Model Space
When you export a layout to model space the following occurs:
External Reference ESW
Hatch
Hide/Shade
Menu Browser
Multileader (mleader)
Multiline Text (mtext)
Open/Save
Partial Open
Plot
Property Palette
Publish
Quick Properties
RECOVER
Render
Ribbon
Visual LISP
ZOOM
I hope this helps you out with your AutoCAD 2009 experience.
Wednesday, July 9, 2008
Why the Ribon is Bad and Good
There has been a lot of discussion with regards to Autodesk's changes to AutoCAD's interface. There have been many complaints about the ribbon and that it is considered inefficient by many of its users. I feel that the claims of inefficiency are valid when compared to using toolbars and somewhat agree to its comparison to pulldown menus. The issue here is that it takes more clicks to get to the command needed. You can’t disagree with that because it’s true, just count the clicks and mouse movements to get to a command.
I am not saying the ribbon is garbage; I only want to point out the fact that if you are a user that works with toolbars and menus, then you will have efficiency issues.
I propose that toolbars and menus are still less efficient to use then keyboard input. Admittedly I am an old DOS based AutoCAD user and learned to use cad with keyboard entries, a tablet, and the menu screen. Perhaps that makes my opinion a biased one.
If a user can type with the left hand and work the mouse with the right then this, in my opinion, is the most efficient use of time. This work process means a user doesn’t have to move the mouse back and forth across the screen increasing the time it takes to work. It is much quicker to use the keyboard and mouse simultaneously. I call this method “Two-Handed CADing.” “One-Handed CADing” would have the user ignoring the keyboard as much as possible while moving the mouse over the entire screen. This method also takes up more screen real estate. Because more buttons (menus, toolbars, etc.) are needed. If the toolbars and menus change, then the user can not work as efficiently until the new interface is learned.
Two-Handed CADers use keyboard shortcuts. What if they change? Then they can easily open the old alias file, copy and paste the customizations into the new one. They do not have to learn anything unless it is for a new command. Much easier than relearning a program they already knew.
This is where I feel the Ribbon fist best, with Two-Handed practices. Even though TH (Two-Handed) users key in commands, several often use toolbars, palettes, or menus every once in a while. I know that I do. Sections of the Ribbon can be pulled out (like toolbars) and placed anywhere on the screen, while the rest of the Ribbon is collapsed, docked, hidden, or left alone. This has the potential of using even less screen real estate.
For these two reasons I like the Ribbon. It fits well with my Two-Handed style of CAD use.
Do you like it or hate it? Why?
Thursday, May 29, 2008
What’s Wrong With AutoCAD 2009?
Autodesk has released a new file that lists several known (and admitted) issues with the software. It also has some workarounds in it. Here are some of the topics in the list:
- Installation Configuration
- Network Licensing
- Graphics Card Info
- CUI
- Vista Specific Issues
- 64-bit Specific Issues
- 3D Modeling and Animation
- Miscellaneous Items
Wednesday, May 21, 2008
Workaround - AutoCAD 2009 - Find/Replace - no Zoom!
In a previous post, AutoCAD 2009 - Find and Replace, I spoke about the changes in AutoCAD 2009's Find and replace command. It now automatically zooms to the text you find, but when you quit the command you are returned to where you were when you started the command. That means you can no longer use the find command to find text!
One of CAD-a-Blog's great and highly intelligent readers came up with a work around. Use the find command and zoom to the text. Close the command. then execute a Zoom PREVIOUS!!! Fantastic! It works, I tried it. It also works in 2008.
Just start the find command, find your text, zoom to it (it does this automatically now). Then close the command. Then start the zoom command, then type in P for previous and there you go, at your text!
Great tip, great workaround! Keep them coming.
Happy CADing!
Thursday, April 24, 2008
AutoCAD 2008 & 2009– Scale List Clean UP
AutoCAD – Scale List Clean UP
How annoying are the annotation scales that just fill your list like crazy? The list gets so big that it fills your screen and you can’t find the scale you want to! It’s awful. AutoCAD 2009 now has a prompt to help this out. You can turn off the scale list from referenced files if you don’t want to see them. This isn’t full proof, however as the file can still fill up all on its own.
Autodesk has released an add on (a patch if you will) that can run in AutoCAD 2008 and AutoCAD 2009 to clean up the annotated scale list.
The scale list patch will available at Autodek’s Support Site soon (tomorrow they say):
http://support.autodesk.com
Here is an overview as taken from Shaan Hurley’s blog:
Description of Problem
When a file contains excess scales, performance may be negatively affected. Eventually, the file may become unusable. To use the file, some scales must be removed. This utility repairs affected files by removing excess scales.
NOTE: Nested external references (xrefs) may produce excess scales. To correct this problem, install AutoCAD 2008 Service Pack 1 or corresponding service packs for AutoCAD-based products. The Scale List Cleanup Utility repairs files affected before the necessary service pack was installed.
Affected Products
· AutoCAD® 2008-based products, including DWG TrueView™ 2008
· AutoCAD® 2009-based products, including DWG TrueView 2009
Installation Instructions
To install the Scale List Cleanup Utility
This utility has to be installed in the AutoCAD 2008 or AutoCAD 2009 installation folders.
You must have administrative privileges on your Microsoft® Windows® operating system to complete installation.
1. Based on your operating system (32-bit or 64-bit), download the appropriate self-extracting executable file.
2. Select a folder.
3. Extract files to the selected folder.
4. Navigate to the folder and copy CleanupScales.exe, CleanupScalesRes.dll, and CleanupScales.html to the installation directory of your AutoCAD-based product.
NOTE: To run this utility you must launch CleanupScales.exe from the installation directory of your AutoCAD-based product.
Repair Affected Files
To repair affected files
1. Close all affected files. Open affected files will not be repaired.
2. Launch the Scale List Cleanup Utility from the installation folder of your AutoCAD-based product.
3. Under Files to Clean, select affected files.
4. If desired, select Maintain Visual Fidelity for Annotative Objects.
NOTE: This option allows you to maintain visual fidelity for annotative objects when they are viewed in AutoCAD 2007 or earlier releases and corresponds to the SAVEFIDELITY system variable. Annotative objects may have multiple scale representations. When you select this option, annotative objects are decomposed and scale representations are saved (in an anonymous block) to separate layers, which are named based on their original layer and appended with a number.
5. Under New Scale List, in the drop-down list, select a scale list template.
NOTE: Each scale list template contains a different scale list. When you run this utility, unused scales are deleted from files and the scale list from the selected template is applied.
6. If desired, change the scale list threshold.
NOTE: The scale list threshold determines the minimum number of scales a file must contain in order to be repaired. The default scale list threshold is 50. Files that contain fewer scales than the scale list threshold will not be repaired. To change the scale list threshold, on the New scale list panel, enter a number in the Scale List Threshold field.
7. Click OK. Repaired files are saved in the same format last saved in.
Wednesday, April 23, 2008
AutoCAD 2009 – Color Change – WHY?
I can’t tell you why the background color of AutoCAD 2009 was changed to white, but it is. You can change it back to black, or any color, very easily. Open your OPTIONS window (type in OP at the command line) and go to the DISPLAY tab.
Click on the COLORS button near the center on the left of the window. A new dialog box will come up. At the TOP on the LEFT, there will be a box called Content. Select (it will highlight when you select it) the 2D MODEL SPACE option. Then near the center of the window, on the interface element OPTIONS, select the UNIFORM BACKGORUND option. Then, on the top right of the screen, there will be a COLOR option box. Click on the arrow to bring up a list of colors. Pick the one you want (I chose black).
That is how you switch your colors, for anything. Play with the options and see if you can come up with a better color solution.
Happy CADDINGAutoCAD 2009-Extended Tooltips
More information is great, the first few times you need it. But once you have learned what the command does, the advanced tooltips simply get in the way. A common occurrence is to work on something, leave your mouse at one spot for a few seconds only to have the information you are trying to read and use covered up by the tooltips. This is very annoying. How do you deal with this?
There are a few options. This is AutoCAD, where everything can be customized (mostly anythin g.) If you open your configuration dialog (type in OP at the command line) and go to the DISPLAY tab, there is a button you can push to turn tooltips off. That’s great, no more interference. However, there are no more tooltips either.
If you want the tooltips, but not the Advanced, or Extended, tooltips, there is a button to turn only those off. This may be the compromise you want. You get the tooltips, but not the giant window of tooltips covering your work area.
A third option and one I suggest you try, is to set the time AutoCAD 2009 waits to show the extended tooltips to a high number. Its default setting is 20 seconds. Set it 45 or 60. Try it out until you find a number you can live with. Tweaking this setting will allow you more time to keep your mouse still but still call up the extra data if you want it. You might find that this will allow you to get that extra little help you need every once in a while, but yet keep your screen open and friendly.
I hope this helps.
Happy CADDING
Tuesday, April 22, 2008
Should I upgrade to AutoCAD 2009?
That is the million dollar question now isn’t it? Not only for AutoCAD 2009, but every time a new release comes out, especially when they are yearly. The times a new release came out after two years of waiting it was easier to jump into it (for some reason).
It is my professional opinion that no release has ever been a “must upgrade.” I don’t feel that there is an absolute reason to upgrade every release; even if you or your company is on the subscription plan.
I do feel, however, that it is in the best interest of a company to upgrade every other release. My suggestion to everyone that asks this question is to get on the subscription plan and upgrade at least every other year. Go ahead, make the argument, why pay for something and not use it? Because it is cheaper to buy a release and pay for the subscription every year than it is to buy the release every other year. Plus, if you upgrade every other year then you are essentially keeping up with AutoCAD. You will never be more than one release behind, which in my opinion is acceptable.
To answer the question at hand, I honestly can’t say (in my opinion) that upgrading from AutoCAD 2008 to AutoCAD 2009 is a must. But I can say that if you are running AutoCAD 2007 or later, then it is a good idea. There are enough features between two releases that justify an upgrade.
Another idea is to look at the DWG file types as a release, and the others as an update or patch. The latest are the 2004 and 2007 types. The 2004 type is covered in releases 2004, 2005, and 2006. The 2007 types are 2007, 2008, and 2009. I assume that release 2010 will be a new DWG type. Instead of upgrading every release or every other release, perhaps every third release is an option. Up grade at the last release of every type, that way you have all of the options available for that DWG type. This would be a good reason to upgrade to 2009 and then essentially wait until 2012 to upgrade again. You will start to get a little behind, but I feel that it is still acceptable. And, if you are on subscription, it is still cheaper to buy it every year than to pay the full price every three years. Beyond three releases it isn’t cheaper.
This might not answer the question at hand, but I feel that it is really a much deeper and more involved question than simply upgrading to AutoCAD 2009 or not. Until Autodesk provides a release with a feature, or feature set, that will absolutely enable you to make more money, then there will never be a reason to upgrade to a single release. You and your company have to look at “the big picture.” The bottom line is that you need AutoCAD to either produce design drawings (as a service) or to produce drawings that enable you to create something to sell. Can you do that with your current software? Will the new release improve production efficiency more than it will cost? That last question is the killer.
Consider all of these concepts and come up with a plan that suits the needs of your company and its budget. Then you will be able to answer the question, do I upgrade or not?
Thursday, April 17, 2008
AutoCAD 2009 - Find and Replace, no zoom
It has been brought to my attention that when using the Find and Replace function in AutoCAD 2009, that you can not actually go to the text you find. While in the function, 2009 zooms to that object automatically. When you end the Find command, it zooms back to where you were when you started.
This means that you will have to FIND (automatically zoom to within the command), make your changes within the Find command, then close.
It used to be that when you zoomed to text in the find command you could then close the function and be where your text was. Evidently not any more.
But you can edit the text right there within the find command, just not anything else.
The automatic zoom is a nice feature, but I really want to end up where I am editing my drawing at. Follow me here? What is happening now, is that I have no idea where it was that I changed my text!! It could have been anywhere.
Keep this in mind when you use the find replace command.
Thursday, April 10, 2008
AutoCAD 2009 – Customize Ribbon Panels
The AutoCAD 2009 Ribbon panels can be customized. If you are familiar with the CUI, then this should be easy enough for you. If not, it is still quite simple. Let’s go.
 Open the CUI (type in CUI or right click a panel, toolbar, etc. and click the CUSTOMIZE item.) Make sure you are working on the workspace you want to customize. Scroll down the CUI until you get to the Ribbon Panels. Expand the Ribbon Panel list. Now you can edit an existing panel, or make a new one.
Editing a Panel. Expand the panel you want to customize. To remove an item in the panel, select it, right click and pick the remove option. To add a new (well, anything new really) panel, row, sub-panel, flyout, or separator, right click the panel name and select the item you want to add. To add a command, go to the command list, find the command you want to add, click and drag it to the desired location on the panel. Easy enough.
Creating a New Panel. Right click a panel, and then pick the NEW PANEL option. Name the panel and start adding your items just like you did when editing an existing panel.
Most of the items in a panel are pretty obvious, like Panel Separator. It provides a space that separates items in the panel. Flyout creates a flyout, similar to the flyouts in tool bars. A ROW, is just that. It provides a place for your commands to go. You can have one row or more, just add them. When adding a command to a row, drag it to the side of the row and drop it there.
Sub-Panels are a little different. A sub-panel has to go into a row. You can’t place them directly into the panel like you do a row. The sub-panel creates an area in a row to group commands in. Take a look at some of the existing panels to get a good idea of how they work. Sub-panels can have rows in them too.
When you are finished customizing your panel, make sure you put it in a TAB, otherwise it won’t show up anywhere in the ribbon.
Happy CADDING
AutoCAD 2009 – Customize the Ribbon
 How can I customize the Ribbon in AutoCAD 2009? Easy enough. Start the CUI. You can do this many ways. I suggest you type in CUI at the command line. Or, you can right-click anywhere on the ribbon and then click on Customize.
 Expand the CUI window, if it isn’t already. Activate the Workspace you want to customize the Ribbon for. Scroll down to the RIBBON TABS list. Each TAB is listed there. Here you can create a new tab, or edit the existing tabs. All you can really change here are the Panels that are in the tab.
Go to the TAB you want to edit and expand that list. To remove a panel, go to the Panel you want to remove, right-click it and select the remove option. To add a tab, scroll down to the RIBBON PANELS list. Find the panel you want to add, click and drag it to the proper tab and drop it. You can change the order of the panels by dragging them to where you want them. You can also change the order of the panels while working in AutoCAD, and not in the CUI. Just drag the panel tab to the location you want it to be in.
While you are in the Ribbon Tabs list, you can also duplicate a tab. Right click the tab you want to duplicate, and click the duplicate button. Ingenious concept right? Did you notice the COPY option when you right-clicked the tab? The difference between duplicate and copy are simple. Duplicate will make a copy of the tab and place it in the list. The COPY option makes a copy of the tab and places it in your clipboard so you can paste it somewhere.
That is how you customize the Ribbon tabs. Later on I will post about customizing the Ribbon Panels.
Happy CADDING!!
Monday, April 7, 2008
AutoCAD 2009 – Like it? Then PIN it
 AutoCAD 2009 now has a PIN feature in almost every dialog box there is (keyword – almost). What do I mean by PIN you ask? Great question. In this instance, to PIN something, means to hold it in place in order to keep it visible. This is a process or feature that is popular in message boards on the Internet. Autodesk just brought it over into AutoCAD.
 Two questions: How do I PIN something and how do I know if it can be pinned? You guys (and gals) really ask great questions. My readers are the smartest readers on the net. I mean that. If something can be pinned, there will be an icon in that objects dialog box that looks like a pushpin. See image at the left:
In order to pin it, just click the PIN looking icon. To “UN”-pin it, click the icon again. Very simple.
If you want a file to stay listed in your menu-browser, just pin it. This is real nice when you are working on a particular file over and over again. Some dialog boxes will collapse, or partially collapse, but you can pin many of them opened. The Action Recorder is like this. Pin it open to see more of the recorded actions that were recorded.
You can pin the Quick View Drawings, or Quick View Layout images to stay opened if you want to.
Look for the pin, if it see it and you want it, click it. If you get tired of it (whatever IT is) click the pushpin looking icon again to close the item. Very simple, just like I like it.
Monday, March 31, 2008
AutoCAD 2009 - 3D Navigation Tools
How do you get around in your files? How do you navigate? Do you zoom, pan, change views to top, north, south, etc? How easy is that for you? It can be a pain. It can also be difficult remembering where it is you are and where it is you want to go. Well, AutoCAD 2009 has taken some features from other Autodesk products and bundled them together in the ViewCube and the Steering Wheel.
 Subscribe to CAD-a-Blog in a reader
ViewCube
This new tool makes navigating in 3D much easier. It provides a visual aid to display your view orientation. It displays a view of a cube (hence the name) with a direction labeled on each face. For example: the top of the cube is labeled TOP, the front face of the cube is labeled FRONT, the left view of the cube is labeled LEFT, and so on. When your view is changed, the cube rotates informing you of where you are. Click on an area of the cube and your view will rotate to match.
With all things AutoCAD, there are settings for the View Cube. You can set the onscreen position, the size, and the opacity. There are snap settings, which will snap you to the nearest view when dragging the View Cube around to rotate the file (dragging the cube is similar to dragging around the 3D orbit command, but you use the cube.) There are also zoom settings and more. Just set it to fit your needs.
View Object Wheel
Autodesk took this from the Design Review program and adapted it to work in AutoCAD. In a nutshell, it is a visual device for panning, zooming, orbiting, and more. It is more of a 2D device while the View Cube is a 3D device. Activate the View Wheel by clicking on its icon in the status bar. Click the zoom button to zoom, pan, etc. Click the rewind button to replay the frames from previous orientations. This is a good way to restore your original view. Again, you can customize the View Wheel, size opacity, tool messages, and more. Subscribe to CAD-a-Blog in a readerFriday, March 28, 2008
AutoCAD 2009 - Visualization
AutoCAD 2009 has added some new visualization features and enhanced others.
Show Motion
Subscribe to CAD-a-Blog in a reader
Show Motion
In AutoCAD 2009, the new SHOW MOTION feature provides a means to navigate through a file via views. It can be started by entering NAVSMOTION in the command line or by clicking the SHOW MOTION icon in the system tray (that’s probably the best way.) When opened, preview display images (similar in format to Quick View Layouts/Drawings) will appear for each saved view in the file. Click on the GO icon in each preview image to go to that view. Press the play button to play the views like a movie. This might be a nice feature to have turned on a conference room monitor when clients visit. You can play an animation that automatically plays through each saved view in the file. Use the Create New Shot tool to, you guessed it, create a new shot.
NEW View/Shot Properties
The New View dialog box, used to create named views, has been updated and renamed to support the Show Motion feature. This properties box includes the new View Types property as well as a Shot Properties tab. There are three view types; Cinematic, Still, and Recorded Walk.
These shots can be named and created from this function. Select the type (Cinematic, Still, and Recorded Walk) and proceed with the proper steps. Subscribe to CAD-a-Blog in a readerThursday, March 27, 2008
AutoCAD 2009 - Fit and Finish (Continued)
Here are some more tips and tricks for AutoCAD 2009. We are still talking about fit and finish items in the upgrade. Fit and finish items are those little things that help to make an upgrade worth it. They are the little fixes and enhancements in AutoCAD 2009 that add up and make it worth the effort.
Nonrectangular Viewports in Properties. AutoCAD 2009 properties pallets will now support nonrectangular viewports. If you had one of these, and opened it up in the properties pallet, there would be two items listed; one was the viewport, the other was a polyline. You had to then select the viewport (another step) to be able to edit it. Not anymore. Now AutoCAD is smart enough to know that you want the viewport, not the polyline.
Happy CADDING !!
Subscribe to CAD-a-Blog in a reader
Nonrectangular Viewports in Properties. AutoCAD 2009 properties pallets will now support nonrectangular viewports. If you had one of these, and opened it up in the properties pallet, there would be two items listed; one was the viewport, the other was a polyline. You had to then select the viewport (another step) to be able to edit it. Not anymore. Now AutoCAD is smart enough to know that you want the viewport, not the polyline.
Missing Plotters. Do you know the error message you get when an assigned plotter (to a file) is missing from your computer? This often happens when you receive files from outside sources, they have a different plotter than you. Well, now your print manager will prefix that plotter name with “missing”. It’s a little thing, but it helps.
Additional DGN Support and Layer Control. If you have to import DGN files on a regular basis then you will like this. AutoCAD 2009 can reference R7 and R8 type of DGN files. It can also import the leveled layers of Microstation into AutoCAD layers! No more layer 1, 2, 3, 4 ,5, 6 . . . You can give them names so that they make sense! Use the DGNMAPPING command to do this.
Hide Xref Scales. This is a must. Use the VPSCALE setting to hide the annotation scales that come in through xref files. You won’t get those xref 1:100 scales anymore, unless you want to??Happy CADDING !!
Subscribe to CAD-a-Blog in a readerWednesday, March 26, 2008
AutoCAD 2009 - Fit and Finish
Fit and Finish items are small enhancements and additions to the AutoCAD 2009 that help to complete the package. These little details are not enough to demand an upgrade, but they sweeten the pot! Collectively they help to make the upgrade to AutoCAD 2009 well worth it. Lets take a look at these new features:
The Fit and Finish enhancements are a part of what makes upgrading to AutoCAD 2009 a good idea.
Happy CADDING
Subscribe to CAD-a-Blog in a reader
M-Text now has automatic spell checking! Well duh!! Why hasn’t this been in there from the beginning? Everything else has it? I would often forget to go back and spell check a drawing, now I don’t have to, Mtext will do it for me. Yes, I get lazy.
ETransmit is a great way to get your drawings to somebody else. ETransmit allows you to send everything your client, vendor, best friend (whomever) needs to open and read your AutoCAD files. In AutoCAD 2009 eTransmit, you now have the option to save or not to save a drawing before you pack it all up, AND you can purge too.
Dynamic Xclip updates. This is one of my other favorite enhancements in AutoCAD 2009. It used to be that in order to update an xclip you had to generate the polygon, edit the polygon, then update the clip which involved several steps. Now, generate the polygon and grip edit it!! Xclip is instantly updated. This one is real nice.
Export Layouts to model space. At first I scratched my head, and said “huh?” You can import a layout into another layout, but now you can export a layout tab into the model of a different file.
Geographic Locations. Now you can set the geographical location in a file. The command geographiclocation sets the longitude, latitude, and north direction in a file. You can import this information from a .KML or .KMZ file, from your current Google Earth location (very nice), or enter the location values yourself. Here is the dialog box in case you enter the information yourself.

The Fit and Finish enhancements are a part of what makes upgrading to AutoCAD 2009 a good idea.
Happy CADDING
Subscribe to CAD-a-Blog in a reader
Subscribe to:
Comments (Atom)