Monday, March 31, 2008

AutoCAD 2009 - 3D Navigation Tools

How do you get around in your files? How do you navigate? Do you zoom, pan, change views to top, north, south, etc? How easy is that for you? It can be a pain. It can also be difficult remembering where it is you are and where it is you want to go. Well, AutoCAD 2009 has taken some features from other Autodesk products and bundled them together in the ViewCube and the Steering Wheel.

ViewCube

This new tool makes navigating in 3D much easier. It provides a visual aid to display your view orientation. It displays a view of a cube (hence the name) with a direction labeled on each face. For example: the top of the cube is labeled TOP, the front face of the cube is labeled FRONT, the left view of the cube is labeled LEFT, and so on. When your view is changed, the cube rotates informing you of where you are. Click on an area of the cube and your view will rotate to match.

With all things AutoCAD, there are settings for the View Cube. You can set the onscreen position, the size, and the opacity. There are snap settings, which will snap you to the nearest view when dragging the View Cube around to rotate the file (dragging the cube is similar to dragging around the 3D orbit command, but you use the cube.) There are also zoom settings and more. Just set it to fit your needs.

View Object Wheel

Autodesk took this from the Design Review program and adapted it to work in AutoCAD. In a nutshell, it is a visual device for panning, zooming, orbiting, and more. It is more of a 2D device while the View Cube is a 3D device. Activate the View Wheel by clicking on its icon in the status bar. Click the zoom button to zoom, pan, etc. Click the rewind button to replay the frames from previous orientations. This is a good way to restore your original view. Again, you can customize the View Wheel, size opacity, tool messages, and more.


Subscribe to CAD-a-Blog in a reader


Friday, March 28, 2008

AutoCAD 2009 - Visualization

AutoCAD 2009 has added some new visualization features and enhanced others.

Show Motion

In AutoCAD 2009, the new SHOW MOTION feature provides a means to navigate through a file via views. It can be started by entering NAVSMOTION in the command line or by clicking the SHOW MOTION icon in the system tray (that’s probably the best way.) When opened, preview display images (similar in format to Quick View Layouts/Drawings) will appear for each saved view in the file. Click on the GO icon in each preview image to go to that view. Press the play button to play the views like a movie. This might be a nice feature to have turned on a conference room monitor when clients visit. You can play an animation that automatically plays through each saved view in the file. Use the Create New Shot tool to, you guessed it, create a new shot.

NEW View/Shot Properties

The New View dialog box, used to create named views, has been updated and renamed to support the Show Motion feature. This properties box includes the new View Types property as well as a Shot Properties tab. There are three view types; Cinematic, Still, and Recorded Walk.

These shots can be named and created from this function. Select the type (Cinematic, Still, and Recorded Walk) and proceed with the proper steps.

Subscribe to CAD-a-Blog in a reader


Thursday, March 27, 2008

AutoCAD 2009 - Fit and Finish (Continued)

Here are some more tips and tricks for AutoCAD 2009. We are still talking about fit and finish items in the upgrade. Fit and finish items are those little things that help to make an upgrade worth it. They are the little fixes and enhancements in AutoCAD 2009 that add up and make it worth the effort.

Nonrectangular Viewports in Properties. AutoCAD 2009 properties pallets will now support nonrectangular viewports. If you had one of these, and opened it up in the properties pallet, there would be two items listed; one was the viewport, the other was a polyline. You had to then select the viewport (another step) to be able to edit it. Not anymore. Now AutoCAD is smart enough to know that you want the viewport, not the polyline.

Missing Plotters. Do you know the error message you get when an assigned plotter (to a file) is missing from your computer? This often happens when you receive files from outside sources, they have a different plotter than you. Well, now your print manager will prefix that plotter name with “missing”. It’s a little thing, but it helps.

Additional DGN Support and Layer Control. If you have to import DGN files on a regular basis then you will like this. AutoCAD 2009 can reference R7 and R8 type of DGN files. It can also import the leveled layers of Microstation into AutoCAD layers! No more layer 1, 2, 3, 4 ,5, 6 . . . You can give them names so that they make sense! Use the DGNMAPPING command to do this.

Hide Xref Scales. This is a must. Use the VPSCALE setting to hide the annotation scales that come in through xref files. You won’t get those xref 1:100 scales anymore, unless you want to??

Happy CADDING !!

Subscribe to CAD-a-Blog in a reader


Wednesday, March 26, 2008

AutoCAD 2009 - Fit and Finish

Fit and Finish items are small enhancements and additions to the AutoCAD 2009 that help to complete the package. These little details are not enough to demand an upgrade, but they sweeten the pot! Collectively they help to make the upgrade to AutoCAD 2009 well worth it. Lets take a look at these new features:

M-Text now has automatic spell checking! Well duh!! Why hasn’t this been in there from the beginning? Everything else has it? I would often forget to go back and spell check a drawing, now I don’t have to, Mtext will do it for me. Yes, I get lazy.

ETransmit is a great way to get your drawings to somebody else. ETransmit allows you to send everything your client, vendor, best friend (whomever) needs to open and read your AutoCAD files. In AutoCAD 2009 eTransmit, you now have the option to save or not to save a drawing before you pack it all up, AND you can purge too.

Dynamic Xclip updates. This is one of my other favorite enhancements in AutoCAD 2009. It used to be that in order to update an xclip you had to generate the polygon, edit the polygon, then update the clip which involved several steps. Now, generate the polygon and grip edit it!! Xclip is instantly updated. This one is real nice.

Export Layouts to model space. At first I scratched my head, and said “huh?” You can import a layout into another layout, but now you can export a layout tab into the model of a different file.

Geographic Locations. Now you can set the geographical location in a file. The command geographiclocation sets the longitude, latitude, and north direction in a file. You can import this information from a .KML or .KMZ file, from your current Google Earth location (very nice), or enter the location values yourself. Here is the dialog box in case you enter the information yourself.

Find and Replace. I failed to mention earlier that the Find and replace will also now look for text in blocks and in an xref. Now that’s handy.


The Fit and Finish enhancements are a part of what makes upgrading to AutoCAD 2009 a good idea.

Happy CADDING


Subscribe to CAD-a-Blog in a reader


Tuesday, March 25, 2008

Thank you for Linking

March has been great to CAD-a-Blog. I have seen enormous growth in posts, readers, and links. I wanted to say thank you to everyone out there that has visited this site for whatever reason. Thank you.

CAD-a-Blog has been around since July of 2007. I didn't post much, I was the only visitor (because I didn't post much, duh!), it was rather pathetic. Well, in February of this year I decided to get more involved with this blogging thing. So I did. I started off by actually posting to my own blog! Well, enough about me.

Since the last week of February I've gone from a readership of one to nearing 6000 total hits for March! The reason is because of the readers. You keep coming back.

Thank you.

I also want to thank websites like CAD DAILY NEWS for listing my blog on their site and for linking to many of my articles. Cad Daily News shares news articles about CAD every day. I don't know how they find them all! Great work guys.

I can't forget TEN LINKS DAILY for sending out links to many of my articles every week. Thank you.

If I have missed anyone else please let me know!

I can't wait for April to get here!! Thanks again everyone. Don't stop coming over.

AutoCAD 2009 - Find and Replace

I love find and replace. I have used it many times to fix the mistakes that I insisted on copying, and pasting, and pasting, and pasting, and . . . . You get the point.

One of the beautiful things about digital design is that I can copy something over and over again, reducing the amount of time and work it takes to accomplish a task. That also means that whatever I copy has to be correct, or else it will be wrong all over my drawing! Find and Replace can help to fix this. AutoCAD 2009 has enhanced the F & R by providing more options to search with, and more filters to weed out what I don’t want. It will also automatically zoom to the entity we are replacing. That makes the process easier to review before you change it.

Start the Find and Replace command, (I type in FIND). Put some text in there to locate, select the MORE OPTIONS icon to bring up more options (what a concept!). Pick what you want to search through and go! The screen will automatically move to where the object is.
Yet another little thing enhanced to make designing better.

Happy CADDING!
Subscribe to CAD-a-Blog in a reader


AutoCAD 2009 - Interactive Array Preview

Most of us have been using the array command for a long time. I would also venture a guess that most of us get frustrated when what we do in the array command is not what we really want it to do. Huh? I mean, how many times have you set the array command just to find out it wasn’t what you wanted? What if you could see what you were doing before you did it?

In AutoCAD there is a preview, sure, but lets face it, it’s awful. Not any more! Now you can pan, zoom, and actually navigate the drawing before you accept the array command. Now you can take a look at the entire array, or even the drawing, before you are finished!

Start the array command, array something (be creative-have fun with it), make your settings, and now preview. Pan around, zoom, pan some more, etc. Is it what you wanted? Of course, you are that good! Now just click anywhere or press the Escape Key to return to the array dialog box, or right-click to accept it, it’s just like the plot preview.

Subscribe to CAD-a-Blog in a reader


Monday, March 24, 2008

AutoCAD 2009 - Design Drafting Enahncements

I see AutoCAD 2009 as a good reason for anyone to upgrade. Typically, in the past, Autodesk has had a must have release every other time. That opinion can be debated of course, but that is the way it seems to me since I started using release 10. I have felt that the even numbered releases were best. Eleven, ok I guess if you liked that new paper space concept, twelve was a standard for so long, thirteen, nah, fourteen, a classic and so on. Maybe my theory is flawed when Autodesk switched to calling the releases by year, but 2004 was pretty solid , 2005 was nice, but did we need it? 2006 was a must have and changed the way we customize, 2007 was ok if you did 3D, then in 2008 we had annotated scaling!! Best thing since sliced bread. Now, in 2009, we get the best new feature yet. In fact, I feel that it is so good, that I recommend everyone upgrade to 2009 just for this one item, the ACTION RECORDER!! TA DA!!! I’ll keep this short, the action recorder will record what you do in AutoCAD so that those steps can be “played” back for future use. If you ever do the same thing twice, the action recorder is for you. Using it can get kind of hairy, just see me other posts about it. Besides, we have a lot more to talk about. Let’s go!!

Layer Management

Do you work with layers? Most of us do I’m sure. Have you ever wanted to work with your layers while you were drawing? Now you can. The layer manager is now a pallet. It works just like the properties pallet. Now you can alter a layer's setting and the changes are immediate. I guess it is real time layering. Bye bye apply button! Try this out. Open the layer manager, freeze a layer. Did you see what was frozen? How many times have you frozen a layer and have to guess which layer it was? Yes I know the command line tells you which layer you froze, but sometimes you don’t always see it.

DGN Support

AutoCAD 2009 adds further support to Microstaion DGN files. AutoCAD DWG files can be exported to Microstation V7 DGN format. Use the EXPORT or the DGNEXPORT commands to do so. And, when a DGN file is xrefed, select it, right click, and turn on the DWG layers function. If this isn’t enough, use the DGN Mapping tool to map DGN levels, linestyles, lineweights, and colors to regular AutoCAD layers! Use DGNMAPPING for this.

DWFx Support

DWFx files are not that popular, yet. With Windows VISTA becoming more accepted these days, the day of the DWFx file type are coming. The DWFx file type is another form of DWF file. They are in compliance with Window’s XML Paper Specifications (XPS) format. That means that if a DWFx file is sent to somebody with Windows Vista, they can view it with no special software! Also, anyone with the XPS viewer can read them (comes with Vista). You will find that the DWFx file type next to anything DWF related. Autodesk 2009 programs can handle DWFx as well as DWF.

Xref Clipping

I hate having to re-clip an xref. It’s a pain. Not anymore!! Make sure that the XCLIPFRAME setting is on 1. This will display the xclip boundary. Then to reclip the file, grab a grip and drag! The xref is reclipped. Isn’t that so much easier? If you select the clip boundary again, notice there is a new grip. It looks like an arrow. Grip it and drag. The area that is clipped will invert! So nice.


These are just a few of the drafting enhancements. I'll go over more of these as the days go by.

Happy CADDING : )

Subscribe to CAD-a-Blog in a reader


AutoCAD 2009 - Hidden Message Settings

This isn’t a deal maker for me on upgrading to 2009, but it is nice to know it’s there. Have you ever clicked on the box in a message window that says something like “Click here to permanently turn off this message”? Yeah, only later you realized that you should have read that message? Well, now with 2009 it’s never too late! In the options window, go to the settings tab (type in OP to open the options window), click the HIDDEN MESSAGE SETTINGS button. A list of closed messages will appear. If you want any of these to show up again, pick it.

Nice huh?

Subscribe to CAD-a-Blog in a reader


Dead End!


I pass by this street so many times. This time i took a picture with my phone (it's not a great picture, but hey, I'm not a photographer either)

I find it to be humorous, perhaps you do too.

Enjoy.

AutoCAD 2009 - Released March 25th-Are you Ready?

Tomorrow (March 25th) is the big day!! AutoCAD 2009 will finally be released for all of us to use. Those on Subscription should start getting their copies soon, initial installs will happen, and user will soon be cursing the ribbon!

My advice, come here to CAD-a-Blog. I have been posting about AutoCAD 2009 and it's changes for a few weeks now and will continue to do so.

When you load the new software, don't freak out, don't worry, just come here and we will get through this together!!

Friday, March 21, 2008

AutoCAD 2009 – Tooltips

It’s Friday, it’s spring, and it’s AutoCAD 2009 tips and tricks from CAD-a-Blog once again. There are several new features in the 2009 release, like the ribbon, quickview drawings and layouts, the action recorder, and more. Lets not forget the enhancements made in AutoCAD 2009, to existing features. We have already looked at the Infocenter updates, the status bar, and the application window. Today I want to look at the enhancements made to the Tooltips.

Tooltips aren’t new. Perhaps you didn’t even know they were there, or at least what they were called. The tooltips are the “tips” that pop up on your screen when your cursor hovers over a command. Oh yeah, that’s what those things are! Well, in AutoCAD 2009 they are even better! When you do your regular hovering, the standard tooltip comes up, telling what the command is before you click it.

Ok, this reminds me if a funny story. I worked at a company (several years ago) that was transitioning from AutoCAD release 12, in DOS, to AutoCAD release 13, in Windows. The interface was different; it had icons now!! One of our drafters, the first to get it, didn’t know what the icons meant; he had never seen them before. So, in an effort to figure them out he sketched each and every icon on a pad of paper and wrote down the command for each!! WOW, what a lot of work. When my machine was upgraded he made a copy of his ketches for me. But then I told him about tooltips, just let your cursor hover over the icon and the command name will pop up on the screen. He turned a little pale, and we both wondered why he hadn’t noticed that.

Sorry for that trip down memory lane. Let’s get back to topic.

Tooltips are very useful. Now with the many changes to the user interface, and the updating of every icon, it will be difficult for many users to work, at first. Tooltips will help. Now with the Tooltip Help you can get more information on a command other than it’s name. Just hover for a little bit longer and the tooltip window will expand to show you examples on the command! Nice, so now you know the command and how to use it.

With all things AutoCAD, the amount of time it takes for the extended tooltips to appear is adjustable. AND the tooltip itself is customizable. Go into the CUI, select a command, or create a new command, on the panel to the right, go to the EXTENDED HELP FILE area. There you can browse to a file that contains your tooltip info. This means you have to make the file ahead of time.

Rollover Tooltips, basically an extension of the tooltips, provide tips on commands, controls, and objects. How these are displayed are also under your control.

When you start using AutoCAD 2009 and find yourself lost, its ok, just hover your cursor for a few more minutes and the tips will pop up, providing help.

Happy CADDING!!

Subscribe to CAD-a-Blog in a reader


Thursday, March 20, 2008

AutoCAD 2009 – Quick View Drawings


Here is another CAD-a-Blog edition of AutoCAD 2009 Tips & Tricks.


This time I want to look at the new Quick View Drawings feature. It is virtually identical to the Quick View Layouts feature we talked about before. The main difference is that instead of displaying images of the files layout tabs, it displays images of the drawings you currently have open. BUT (there’s always a but), when you hover your cursor over one of the drawings images, that drawings layout tabs will be displayed as if you just activated the Quick View Layout feature! You get a two for one deal here.


All of the options for the Quick View Layout feature are here and similar features for the Quick View Drawing feature are there two. You can save or close a file, open a file, or create a new file. The QVD (Quick View Drawing) feature is started the same way the Quick View Layout feature is. Click the icon for it on the status bar. Very easy, very quick. The QVD images can be pinned and closed by clicking on the icon for it in the QVD Control Panel (that’s the row of icons just below the drawing images), just like the QVL.

That’s it in a nutshell.

Happy CADDING J

Subscribe to CAD-a-Blog in a reader


AUGI World Article-Making a Better Impression

AUGI World for March/April has been released. If you are a member of AUGI, you should be receiving your printed copy soon. If you can't wait, then here is a link:AUGI World


And see my article in AUGI World, Making a Better Impression. This article covers the new features and enhancements in Impression 2.0

Wednesday, March 19, 2008

AutoCAD 2009 – Quick View Layouts


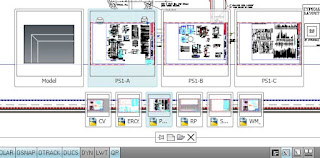
How do you know what is in the layout tab of a file? You don’t until you open that tab. Not anymore!! With AutoCAD 2009 we now have Quick View Layouts. I mentioned this in my review of the status bar (as well as other things, go check it out for a quick review).

The Quick View Layouts do more than display an image of the layout tabs of a file. If you select one, the drawing will open to that tab. Nice! You can see the tab and make a selection based on what is in there, not what you remember. This is an especially nice feature when you work with other people’s drawings.

What else can we do with this new feature? Plot, publish, create a new layout, and everything else that we could do before. The Quick View Layouts really replace the layout tabs, though you can still turn them on if you want to. If you want to plot or publish a tab, click either icon that appears in the Quick View Layout image, they are at the top and on either side. You can print a layout without opening it!

If you right click a quick view image, you get all of the old fashioned options to choose from. You can also PIN the QVL images so that they stay up on your screen. I’ll post again about the PIN option that is all over AutoCAD 2009. You can PIN just about anything these days!

One little odd thing about the QVL, is that it cannot display a preview image of model space?? There is a placeholder image. I don’t know why, sorry. Also, until a preview image is created, there will be a placeholder image for the tabs. Just save the file or activate the tab to create the image.

You can start the QVL by clicking the icon on the status bar, or (for the keyboard junkies like me) type in QVLAYOUT. I think that it might be easier to click the icon!

Happy CADDING : )

Subscribe to CAD-a-Blog in a reader


Tuesday, March 18, 2008

Autodesk University - Screencasts

How many of you have ever wanted to attend Autodesk University but couldn't for some reason? Even though AU 2007 had a record of over 10,000 visitors, there are still many users that weren't there. Now is your chance to attend AU 2007!! But it's 2008 Brian, what's up?

http://au.autodesk.com/sessions/

Click on the link above, join the community, and watch the screen casts on your computer. It's just like attending AU, only you can stop it to take a break!! You can watch it again and again. Download the class handouts and watch the screen cast! What a great idea. I recommend checking out the site.

There are over 500 hours of training available to watch with over 1000 classes!! If you want to know how to do it, odds are it's in there.

AutoCAD 2009 – Quick Properties


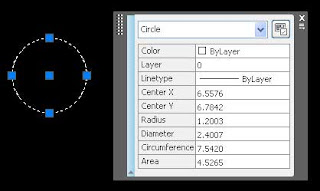
One of the new features in AutoCAD 2009 is the Quick Properties panel. It works just at it sounds. When you select an item the Quick Properties panel will open, displaying a small set of properties on that subject. I typically work with my properties window open at all times and pulled off to my second monitor. If you don’t have a second monitor then the quick properties panel might help you out.

In order to turn this feature on or off, just toggle it on/off in the status bar. If you right click the QP icon and click the settings option, the Drafting Settings window will open. Here you can change the display settings for the quick properties. If you want to change what information is shown, go into the CUI, under the Quick Properties area. There is a list of items that you can choose from, like; Arc, Circle, Hatch, Leader, Line, Mtext, etc. Pick one of these items and select the properties you want to show. If you need to know the layer, or the length of lines turn that on and everything else. It is up to you.

One of the settings that you can choose from is the location setting. You can set it to CURSOR, so that the panel will open where your cursor is. The other option is to set it to FLOATER, so that it will open in the same place all of the time. Just pick the one that suits you the best.

If you need all of the information then stick with the properties pallet. The quick properties panel is nice tool to use when quickly inspecting your drawing objects. Select the object and the panel opens. Unselect and the panel goes away. If this new feature annoys you, turn it off.

Happy CADDING!

Subscribe in a reader


Monday, March 17, 2008

AUGI Article - Design Review (I wrote it)

AUGI was kind enough to post another article of mine. This one talks about Autodesk Design Review. If you are a member of AUGI, click the link. If you aren't a member of AUGI, click the link anyway and join. It's free!!!

If you want to see what's new in Design Review 2009, take a look at my blog where I give it a review.

Happy CADDING!

Subscribe in a reader


Friday, March 14, 2008

AutoCAD 2009 – Status Bar

Ok, I know the status bar is not rocket surgery, but, there were a few tweaks that happened to it in AutoCAD 2009. Who likes icons? Who likes text? Doesn’t matter. Pick the one you want and that is how you will see the toggle buttons on the far left of the status bar. The toggle buttons toggle certain settings on or off. These settings include SNAP, GRID, ORTHO, POLAR, OSNAP, OTRACK, DUCS, DYN, LWT, AND QP. QP?? Yeah, the new Quick Properties function. What’s that? Later my friend, I can post everything in one day, especially this late on a Friday. Well, the quick properties is a new function that will display some basic properties of an item or object when it is selected. Think of it as a miniature Properties Pallet that shows up with one click!! It’s cool. Each user can set up which properties that are displayed in the QP.

Back to topic. Switching from icons or text for the toggle buttons is a simple as right clicking one of the button and selecting/deselecting the USE ICON option. Use the one you like best. Right clicking certain toggle buttons will provide you with more settings for that particular function. It is very easy to manipulate these settings now.

The model and the layout buttons are now on the right side of the status bar along with some new tools. The layout flyout has been replaced with the QUICK VIEW Layouts (I’ll get into this one later) and the QUICK VIEW Drawings buttons (again, later). These new functions quickly display the open drawings and the layouts in the current file giving a small preview of them and allowing for selection. The status bar now also includes the newest tools meant for easy navigation and viewing. These are the Steering Wheel (just like in Design Review), Show Motion, pan, zoom (classics), a new workspace switching station (which takes up less space now in the status bar), and the new Viewport/Annotation toggle that replaces the annotation scale button in order to sync the annotation scale with the view port scale.

That’s the new Status Bar. Not too flashy, but it locates some of the new tools and revamps several familiar ones.

Happy Cadding!!

Subscribe in a reader


Happy PI Day everyone!!!

Official PI Day Site

Wow, I'd thought it would never get here!!! I learned about this festive day about 10 months ago and have looked forward to it ever since!! In America (where we look for any reason to party!!), the dating system has today as 3/14/2008. So, since 1988, every March the 14th, we have (I'm not so sure what I mean by WE) celebrated PI Day. It is a day set aside to remember and appreciate all things PI, all things math, and all things, well, nerdy!! Why not? I for one am a man that is proud of his geekdom, proud of that fact that I can say some things in Klingon, and that I know PI to (3.14159265) eight digits!!! Put that on your resume!!

I have also convinced my boss to pie Pizza PI's for everyone in the office today in celebration!! Thanks Strickland, you rock!! (Do you think he reads my blog?)

So, have fun with it out there, and eat some PI for me!!!

p.s. the number PI is derived from the ratio of the diameter of a circle to its circumference.

Happy CADDING.

other sites celebrating PI day:
It is alive in the Lab
Mistress of Dorkness
Official PI Day Site
PI Clothes

Guest Blog for CAD-a Blog

I would like to give a thanks to Shaan Hurley of Autodesk for allowing me to be a guest blogger for his blog, Between the Lines. In case you missed it here is a link, Shaan Hurley.

Shaan is the Technical Marketing Mgr. & Worldwide My Feedback Mgr. at Autodesk ,Inc. He has a great blog that has many useful tips and interesting information. I wanted to say thank you to Shaan. And if there is anyone out there that would like a guest blogger let me know, perhaps I could write something for you.

The most comments that I have received about the guest blog was, "Hey Brian nice post, did you here the Oscar Myer song in Spanish?" I think most people scrolled through my article and immediately picked up on Shaan's postings about the seeing the Wiener mobile.

Oh well, how can only expect to compete with that right?

Happy CADDING?

Thursday, March 13, 2008

AutoCAD 2009 - Infocenter Enhancements

Infocenter is not new to AutoCAD, but in the 2009 release it has been improved. I have found Infocenter to be a great tool because I can search for answers in a number of places. The enhancements to it allow the user to expand the search field or to collapse it. This helps to save screen real estate (a big mantra in AutoCAD 2009.) The other biggest improvement is that when searching through the help files, the user can select which documents to look through. This also means that users can search through company documents too. If you have a CAD manual, or even non-AutoCAD documents, they can be searched through in Infocenter. How great is that?

I would like to mention that Infocenter could also be an RSS (Real Simple Syndication) reader. What is an RSS much less an RSS reader? An RSS is simply a way to let others know a website, or blog, or some sort of informational site has been updated. When an RSS feed enabled site has been updated, a note goes out through the RSS feed. Anyone that has subscribed to that feed will be made aware and provided a link. This makes communication very easy. I have an RSS Feed for CAD-a-Blog. If you haven’t signed up for it go ahead. Just click on the RSS Feed button at the top right hand portion of the site. That way when I add something you will know and can get right over here to see it. You don’t have to come here and try and figure out what’s new, if anything. It’s a way of me, helping you, to get the latest info. It is also a courtesy to you to help you maximize your time.

This is also a great tool for CAD Managers to use to help their users. A CAD Manager could set up an RSS feed and have each AutoCAD station set to read it. When an announcement, a new standard, or some bit of information needs to get out to the masses, the manager can update the site and all users will be notified. It could be a great tool.

The newly enhanced Infocenter makes these things much easier to maintain and use.

To add a feed to the Infocenter, or to the Communication Center in AutoCAD 2009, right click the Infocenter icon, click SERACH SETTINGS, and then go to the RSS Feeds button. Click it. A list will be displayed of the current feeds you have set up. To add a feed, click the ADD button at the top. Now, add the feed for CAD-a-Blog: http://feeds.feedburner.com/Cad-a-blog

Happy CADDING!!

Subscribe in a reader


Wednesday, March 12, 2008

AutoCAD 2009 – Quick Access Toolbar


Hello and welcome to CAD-a-Blog. Here is another AutoCAD 2009 tip about the Quick Access toolbar. This is a nice new feature that will help a user do things quickly. It doesn’t speed or slow up time so you can get more work done, it does provide easy access to buttons that will enable frequently used commands.

Earlier I blogged about AutoCAD 2009 has revamping the user interface. One of those changes, or additions in this case, is the Quick Access Toolbar. I like to call it the QAT!

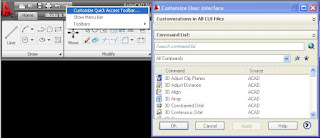
The QAT resides in the upper left corner of the Application Window, in AutoCAD 2009. Out of the box it has six icons on it: qnew, open, save, plot, undo, and redo. No more FILE, OPEN, etc. No more looking for the standard toolbar and clicking NEW. Just go up to the QAT and click the appropriate button. If you don’t like these commands, or if you feel the QAT is lacking, right click it (the QAT that is) and select the “CUSTOMIZE QUICK ACCESS TOOLBAR” option. It will open a CUI window. Find the command you want and drag it to the QAT. This customization is saved in the workspace so if you change your workspace, the QAT will change.

For those of you suffering from toolbar and menu bar withdrawal, right click the QAT and turn those bad boys back on!!! Yay!!! I suggest you don’t, give the poor ribbon a chance will ya? If there is just one icon (toolbar) that you can’t live without, put that command in the QAT.

I hope this helps. Happy CADDING!!!

Subscribe in a reader


Tuesday, March 11, 2008

AutoCAD 2009 Application Window


AutoCAD 2009’s biggest change is the user interface.


We spoke AutoCAD’s new Ribbon and the new Menu Browser, but I want to step back a bit, and take a look at the new Application Window. The Application Window (I didn’t realize it was called this) is what you see when you are using AutoCAD (see screen shot above.) It has the drawing area, the status bar, the ribbon (in 2009), the info center, menu browser, quick access toolbar, etc. Whatever there is to work with it’s in there.

Out of the box, AutoCAD 2009 looks very different because of these changes. One of the first things you might notice is that the toolbars are missing and it appears the pull down menus are gone or at least changed. The ribbon has replaced these items. It has also replaced the dashboard! If a user types in the command “DASHBOARD” to try and bring it up, the ribbon opens (if it isn’t already.) So, no more dashboard either. If you find that you can’t work without toolbars or pull down menus, change your workspace to “AutoCAD Classic”. This will turn off the ribbon, bring back the pull downs and open toolbars. If you want the ribbon back, just type in dashboard (or ribbon) at the command line. I suggest you try to get through the change by working with the ribbon. It does reduce screen real estate.

Another change is the Menu Browser. I talked about this earlier. Since the pull down menus are now separated into the Ribbon and the Menu Browser, each one is better suited to give you more. They take up less room and have more abilities than their predecessors. One of the greatest advantages with the new menu browser is the ability to PIN recent documents, commands and more. We didn’t have that before. It makes repetitive work easier to get to.

I plan on looking at more of the new features in AutoCAD 2009 in the next several posts.

Happy CADDING!!


Subscribe in a reader


Monday, March 10, 2008

Quick Insert of Spreadsheet into CAD file (and link them)

I’m going to finish up my posts on data extraction with a tip & trick on how to get data into your AutoCAD file. I have posted about the new feature in AutoCAD 2008 called DATAEXTRACTION, I discussed using the older commands of ATTEXT and EATTEXT, and I also talked about the BCOUNT command.

Today I want to show you how easy it is to take existing data in a spreadsheet, put it into AutoCAD, and have the two linked.

This is a very useful tip when one employee creates a spreadsheet for a report that has data that also needs to go into a cad drawing. It is even more useful to have both documents (the report and the drawing) to have the same data, be it right or wrong.

Very simply, open the spreadsheet file. Select the cells that you want to have in the CAD file. Copy them (right click, then copy – or click on edit, copy.) Open the AutoCAD file (or Civil3D, Revit, etc.). Click on the EDIT, PASTE SPECIAL. Don’t use the paste command, your data is special, treat it that way.

A window will open. Select the appropriate file type (in my case a Microsoft Excel Worksheet.) If you want the data to be linked to the spreadsheet (which I do) then make sure to select the PASTE LINK button. This will link the data in your cad file to the spreadsheet. If the spreadsheet is changed, then your drawing will reflect that change. Pick you insert point and there you go.

You can’t change this info in the cad file, only in the spreadsheet. You can change the size, layer, plot quality, etc. Select eh object, right click and select OLE. This will give you sizing ability and allow you to automatically open the spreadsheet.

There is nothing fantastic about this method, but it is a quick and easy way to get data into your drawing that is linked to the source. This will keep your drawings and your reports in sync.

Happy CADDING!!


 Subscribe in a reader

Sunday, March 9, 2008

Free AutoCAD Training from AUGI (and I'm teaching!!)

Are you looking to better yourself as an AutoCAD user? Is there something you don't know how to do, but want to? Or maybe you need a refresher? Maybe you want to have a better understanding on? Often the biggest two obstacles to these problems are time and money. Perhaps you only have one of these problems. I would like to offer help in two ways.

First offer. CAD-a-Blog. CAD-a-Blog has tips and tricks of all kinds. If you ever see anything missing, let me know. Post a comment on one of the other posts, or, e-mail me. I will be happy to try to provide a post addressing a readers question. Plus it makes my job easier of coming up with ideas!! So, help me, help you, well, you get the idea.

Second offer. AUGI (AutoCAD User Group International) has free training available in all sorts of Autodesk programs. There are several different types of classes and subjects. Some teach LISP, some teach Revit, others provide tips and trick. If you want to know how to do something in AutoCAD, AUGI's ATP (AUGI Training Program) can teach you. I have participated in many of these classes myself. If you missed a class, or don't see a current class that interests you, go to the archives. There they have downloads of past classes. This list of classes goes back several years which provides many subjects to choose from. I suggest that you take advantage of these free classes.

Now for the best news. On April 7th, I will be the instructor on one of the next classes for AUGI's ATP courses. The course will cover the new items in AutoCAD 2009. Please attend, I will be glad to see you in class.

Friday, March 7, 2008

More Data Extraction Tips

I have been posting about data extraction lately, so why stop now right? I posted about the ATTEXT and the EATTEXT (always makes me hungry). I also posted about the DATAEXTRACTION command too (this is really nice by the way.) Now I want to talk with you about a command that is very simple, but can get you basic information very quickly. It is also the easiest to use. That command is BCOUNT.

BCOUNT counts the blocks in a file and returns that info to you in the command line. So, lets go!!

Type in BCOUNT, select the objects you want to count, then enter. The command line will scroll with text, first stating the number of blocks selected, then each block with how many of each. Very simple. If you need that data, just select it in the command line, copy, and paste it to wherever you want to.

BCOUNT is not perfect. If you have accidentally inserted a block on top of a block, it will count both (this is true for all data extraction tools.) Also, BCOUNT won't count dynamic blocks that have been changed. That means if you insert a dynamic block then use one of its dynamic options, BCOUNT can no longer count it, so be careful.

That being said, BCOUNT is a good tool to give you a quick idea of how many of each block you have.

Happy CADDING!!


 Subscribe in a reader

AutoCAD Command History

I'm a sucker for history. I'm also a CAD geek (see my blog.) If you have ever wanted to know when a command came and went in AutoCAD, check out this page by Lee Ambrosius of Hyperpics. This is a chart of the many commands, and it is very colorful. This is just a bit of trivia for most, and trip down memory lane for others.

Have fun with it.

Getting Data From Your File

Yesterday I blogged about the data extraction command (dataextraction.) I failed to mention that command was new to AutoCAD 2008. However, there are several other commands that have been around for a while that can be used. They are not as cool as dataextraction, but they might be able to give you the options you need. Lets go.

ATTEXT

The ATTEXT command has been around since at least Release 12. It will count blocks and extract the data from them. It has the ability to place this data in an external file. There are three file types; CDF (comma delimited file), SDF (space delimited file), or a DXF (format extract file). The CDF and SDF files require a template file that has been created in ascii form. This can be difficult to do if you do have a working understanding of this type. For many releases it was the only way to extract data.

So, start the command, select the objects, the file type, the template, the output file and have at it. I have found that this command can be difficult to use, so I use other options that are available.

EATTEXT

The EATTEXT command will now start the dataextraction command in AutoCAD 2008. Eattext came to us in AutoCAD 2002. Thank goodness because the attext command was tough to use. Ok, start the EATTEXT command (I always get hungry when I use this one.) Determine your extraction type; objects, current drawing, or select drawing. You will have choices (as always) that will include the current drawing only, or to include xref files too. If there are nested blocks you will get the option of picking those too, or not. You will then be able to select your output file type, CSV, TXT, XLS, or MDB.

These are two of the “old school” methods of extracting block data from a drawing. However, the dataextraction command that is new in AutoCAD 2008 can get you info on any object, not just blocks!! If you haven’t switched to 2008 yet and you need to use the data in your files, maybe this will be reason enough to upgrade!!

If not, I hope this post helped.

Happy CADDING.


 Subscribe in a reader

Thursday, March 6, 2008

Object Data-getting it and using it - how?

DO you ever have the need to count the objects in a file or drawing? The “old school” method was to take a print, different colored markers, and physically count each item. Then you would create a chart, or table. This is one way to create a bill of material, or a quantities sheet, or an assets tracking form, what ever you call it. Well, we use AutoCAD to help us out for many reasons, one to draw quicker, revise drawings quicker, and to count items faster too.

DATAEXTRACTION is a command that will automatically count the objects in a file and list them in a table. That list is linked to the objects so that if they change, the table is updated. How cool is that?

How do I start? Well, open your data file. In my case it is a site plan of a small parcel with about 11 residential single-family home lots on it. But yours could be anything that has stuff in it to count. I want to know how many lineal feet of water main pipe, sewer main pipe, and drainage pipe I have. I could dimension each one, or measure each one, and add up the totals, then create a table and input that data into it. Sure, if I had the time.

Enter in DATAEXTRACTION. I am asked if I want to create a new data extraction, edit an existing one, or use a previous extraction as a template. I would normally use one as a template, but I want to show you how to set one up. I pick Create a new one. Then click next. A file name and location are required for this data extraction. The data is counted and stored in this file. When the objects change, the data file can be updated, which will update the table we are about to produce. I name my file and click save.

Now I have to tell AutoCAD what data I want to count. There are two options: Drawing/Sheet set, or Select Objects in the current drawing.

This means that I can select everything in an entire sheet set (holy abacus batman!!) or just pick certain objects in the current file. Pick the one that suits your current needs. I only want to pick from objects in the current file. I find that this fits the majority of my needs, most of the time. I select the button for this and then click on the button that allows me to go into the drawing and actually pick my objects. Ok, then I pick my objects.

I select my objects and press the Enter key. There is a SETTINGS button at the bottom right of this dialog box. I click it. I can then alter some of my extraction settings. These settings allow me to choose if my extracted objects will include objects from an xrefed file or not. I choose not in this case, but pick what ever it is you need to do. I also have the choice of picking only from model space, or from the entire file. I am done with my settings so I click the OK button. I am done with this part so I click the next button.

A list of the object types selected (in my case lines and polylines) is displayed. I can choose to include or exclude any object type from my list at this point. There is also a display options area where I can choose if all object types are displayed according to their block settings (attributed blocks, non-attributed blocks, in use or not.) I am done here so I click the next button.

A list every possible object property is given and I have to choose which ones I want to have in my table. Some of these options are: angle, area, author, closed, color, delta x, delta y, drawing revision, file size, file name, linetype, LT scale, material, thickness, title, layer, and much much more. There is a category filter that will help select and un-select these options. I choose to display the length and the layer because I want to know how much pipe I have of what type. I am done so I once again click the next button.

Now I have a preview of the general setup of my table. There area some options on controlling the rows and columns. I can tell it to combine similar objects, or to separate them for each one. Very handy. I also have the options here to sort the columns how I want them and to link external data to them. There is a full preview button so you can check to see if you got it all right or not. Ii looks good so I click next.

Now I can insert this data into a table in my file, or I can output the data to an external file (.csv, .xls, .mdb, or .txt) I just want to put it in the drawing this time. But I often find that I need this data somewhere else so many times I will export it to an .xls file or a .csv file. This is very useful indeed. I am ready to proceed so I click next.

Now I can change my table settings or use a table template that I already have. I’ll do that and then click on next. One more click. I have to finish by clicking the FINSH button. Good idea there. If I chose for an external file to be created it will be when I click finish. If I chose to insert a table I will have to pick an insertion point after I click finish. Which is what I do. There you go, a nice neat table that is displaying my pipe types (by layer names but you can do this in many different ways) and their lengths.

Since this table is linked to the objects, (my pipes) I can change the length of my pipes. Select the table, right click and select the UPDATE TABLE DATA option to update my table. I don’t have to redo it.

I used this on lines and polylines, but it can be used for blocks too, which can be very useful. If you need to count it, this command can count it.

Experiment with the settings and create a template. Once you get it set up why set it up again right?

Happy CADDING.


 Subscribe in a reader

Wednesday, March 5, 2008

Quick Xref Tip-2 - attachemnt or overlay?

We have all referenced a file at some time, perhaps. Maybe you haven’t yet. I recommend it. It can help to keep drawing data current and accurate across a drawing set.


If you haven't, well I posted another tip on x-reffing (my spell check is going crazy with the red squiggle on x-reffing) a few days ago that provides a few tips on opening files that are referenced. Check it out: X-Ref Quick Tip

Let’s assume that you are referencing files. Good for you. How do you do it? What do you mean “how”? (Yes I am talking to myself. It’s ok, I do it all of the time.) What I mean is do you reference the drawing as an attachment or an overlay? HUH???? (Again, it’s ok that I talk to myself.)

In AutoCAD, when a drawing is referenced, there are two different ways to connect it to your drawing file. One way is as an attachment. The other is as an overlay. What’s the difference? Good question.

Attached files are just that. The data in the file will go with the drawing file it is attached to. On overlay is like Las Vegas, what happens there stays there. Let’s try to clear that up. I have a DWG file, it is file aa.dwg. It is my model file. I need to reference it in my drawing file, file name draw.dwg. I open file draw.dwg. I start the reference manager. I reference my model file (file aa.dwg) to show the linework in my drawing file. I have the choice of making it an attachment reference or an overlay reference.

When the model file is an attachment reference in my drawing file, that information goes with it if I reference the drawing file into another file. If I reference the model file into my drawing file as an overlay, and then reference my drawing file into a different file, that overlay file will not go into the third file. Clear on that?

Why would I choose one over the other? Best question yet. I would reference a file as an attachment if I need those two files to go together, everywhere. If I only need the data from the model to show up in the drawing file, but nowhere else, then an overlay. This will prevent circular references when attaching files and it helps in file management or drawing management procedures. It is often the case that I only need data from a certain file, but in order to create that file I needed the data from a third file.

Think about it. You might be saving yourself some work if you attach or overlay a file.

Happy CADDING!

Tuesday, March 4, 2008

AUGI Wish List - Voting almost over!

If you are a member of AUGI (AutoCAD User Group International), then you are probably aware of the AUGI Wish List. Every year AUGI puts together a list of wish items that its members would like to see added to AutoCAD and many of its vertical applications. During the year AUGI members post their wishes in the appropriate AUGI forum. AUGI then takes these items and put them in a list for us (AUGI members) to vote on. Well, it’s that time again. Time is running out. If you haven’t voted yet, you still have a few days to vote. The wish lists will be open until March 10, 2008.

You can vote on wish lists for AutoCAD, Inventor, Civil3D and Revit Architecture. At these forums, you can read each wish item and then vote for your top ten!! Each wish has been categorized and grouped making it easier to vote for your favorite. After you have chosen your ten favorite, rank them on how important they are to you. Each year Autodesk turns to AUGI to see what their users want in the software. And they listen!

Click on the links below to go and vote today. Hurry up, time is running out.

http://www.augi.com/autocad/ballot.asp

http://www.augi.com/inventor/ballot.asp

http://www.augi.com/civil3D/ballot.asp

http://www.augi.com/revit/ballot.asp

Quick Xref Tip

Here is a quick tip to use when working with xref's. How many times have you been working with a drawing file that is referencing another file only to find that you need to edit that file? Follow me? Example: I was working on a site plan for a small project that was adjacent to another project we did several years ago. To provide background information I referenced a file in the older project.

Well, that older file needed some updating due to a revision to the design. I wanted to open it and make these changes. There are several options to take. I can select the referenced file, right click and start the REFEDIT command. I can also start the REFEDIT command, then select the object.

I could select and then right click the object to select the open file option in the short cut menu. Or I could, FILE, OPEN< then browse. What I did was open the xref manager, right click the file, then select the open option.

Any of these methods works great. The shortcut menu option is probably the quickest, unless you have the option turned off.

Just a quick tip I wanted to share.

Happy CADDING!!

Monday, March 3, 2008

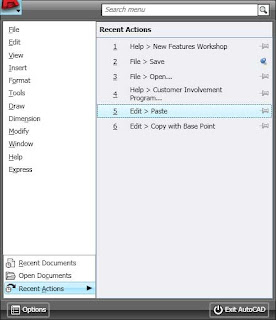
AutoCAD 2009 Menu Browser


In one of my first posts about AutoCAD 2009 (screen shot) I discussed the addition of the Ribbon. That post discussed the changes made in AutoCAD 2009’s user interface, at least the most obvious change, the Ribbon. I went back to re-read it and noticed that I finished it by saying the next post will talk about the Menu Browser. I never did post about it. Sorry. I know the suspense is killing you. Today I would like to end your agonizing wait and talk about the Menu Browser.

If you look at the screen shot provided, look for the giant red A in the top right hand corner. If you have worked with the ribbon on the Office 2007 products from Microsoft, this concept will be familiar to you. Office 2007 has a Microsoft Windows logo in the top left hand corner of the screen. This icon is where you can get to more menu items. In AutoCAD, the giant red A is very similar. Click it to open the Menu Browser.

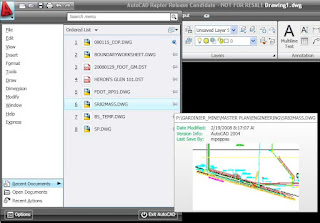
Before clicking this, you might have searched and searched for the pull down menus. They are now in the Menu Browser within the big red A (the big red A reminds of the novel, “The Scarlet Letter” where those convicted of adultery were forced to where a giant red, or scarlet, letter A on their clothing.) If you love using the pull down menus then click the A to bring up a host of menu items. On the left will be a list of the possible menus. The gold old-fashioned, file, edit, view, insert, and more are there. At the bottom of the list there will be the additional menu items of recent documents, open documents, and recent actions. The menu items are nothing new, and neither are the recent and open documents options. The recent actions option is a nice addition. This will provide a list of some of the major actions that you preformed in AutoCAD. There is also a feature that works throughout the Menu Browser, called Pinning. Clicking on the icon that looks like a pushpin will lock that item in place. This can also be done with the recent documents menu option. A user can PIN a particular drawing to the list so that it won’t disappear after opening many other documents. This helps to aid in the quick access of files that are frequently accessed.


At the top of the menu browser there is also a search box. This allows the user to search the CUI for specific or important items. Actually, the items don’t have to be important at all, jus there. Start typing in the LINE command. The menu browser will then start to filter the options to contain only those with the word LINE in them. Click on the displayed command in the Menu Browser to execute the command. Nice!!


There is a preview guide in the Recent Documents menu item that is customizable. The files can be displayed in list form, icon form, or image form. And these too have options like small, medium or large. The list form can be ordered by list, date, or type.

This new interface structure retains many old and familiar methods of view and interacting with data. It also adds new features to familiar settings that can improve the way we work within AutoCAD.

Happy CADDING!!

Categories

AutoDesk (110) autocad (109) AutoCAD 2009 (40) augi (40) efficient (38) news (37) drafting (33) training (33) articles (30) CADaBlog (29) AutoCAD WS (23) Update (23) quick tip (22) video (21) mobile (19) review (19) cad (16) 3D Mouse (15) 3Dconnexion (15) Impression (15) Android (14) AutoCAD 2013 (14) cadalyst (14) me (14) AutoCAD 2010 (13) text (13) off topic (12) survey (12) Apps (11) hotfix (11) tips (11) 3D (10) AU (10) AutoCAD 2011 (10) service pack (10) workstation (10) Autodesk Labs (9) CAD Manager (9) annotation (9) blocks (9) cloud (9) fun (9) inventor (9) HP (8) Review-Product (8) autocad lt (8) videos (8) AutoCAD 2014 (7) Autodesk 360 (7) CUI (7) Windows 8 (7) iOS (7) new (7) IMSI Design (6) cad standards (6) files (6) google (6) infinite skills (6) printers (6) reference (6) ribbon (6) support (6) updates (6) workaround (6) RSS (5) TurboViewer (5) Upgrade (5) data (5) email (5) fields (5) guest post (5) keyboard (5) layers (5) paper space (5) pi (5) pi day (5) quotes (5) rant (5) selection (5) standards (5) styles (5) subscription (5) tech (5) 2D (4) AutoCAD Exchange (4) AutoCAD for Mac (4) Mac (4) Mastering AutoCAD (4) SketchBook (4) TurboCAD (4) UI (4) action recorder (4) dimension (4) driver (4) fills (4) large format printing (4) leaders (4) math (4) mobile workstation (4) salary (4) sheet sets (4) Amazon (3) Apple (3) AutoCAD 2012 (3) AutoCAD 2015 (3) AutoCAD 360 (3) AutoCAD Fundamentals (3) Civil 3D (3) DVD (3) DWF (3) Fusion (3) GIS (3) Kindle Fire (3) Lenovo (3) Microsoft (3) Review-Software (3) Wiley (3) Windows Phone 8 (3) Windows RT (3) annimation (3) announcements (3) autodesk plm (3) book (3) command alias (3) contest (3) filters (3) find (3) hardware (3) history (3) iPad (3) license (3) license software (3) lisp (3) menu browser (3) properties (3) purge (3) quick view (3) saas (3) tables (3) toolbars (3) weekend rant (3) what not to CAD (3) what not to do (3) #CADaBlogDVD2013 (2) 3D Modeling (2) 3ds Max (2) AutoCAD LT 2013 (2) AutoCAD LT for Mac (2) AutoCAD MAC (2) Autodesk. (2) BIM (2) CAD Services (2) CADSpeed (2) DWG (2) DXF (2) Designjet (2) Error (2) FAIL (2) Facecast (2) Freestyle (2) Fusion for Mac (2) George Omura (2) Mac OS (2) Mountain Lion (2) Novedge (2) Recomend (2) Review-Book (2) Revit LT (2) SpaceMouse Pro (2) Sybex (2) Tablet (2) Thinkstation (2) TurboReview (2) TurboViewer X (2) What Not To Do In AutoCAD (2) What's New (2) Windows (2) array (2) as-builts (2) beta (2) blog (2) circles (2) civil (2) civil design (2) collaboration (2) color (2) command line (2) commands (2) computer (2) copy (2) design (2) design review (2) dim style (2) download (2) eBook (2) eTransmit (2) file naming (2) free (2) geek stuff (2) grid (2) hotnews (2) interview (2) jobs (2) knowledge base (2) limits (2) look back (2) mouse (2) pallets (2) pgp (2) plotting (2) posts (2) press release (2) pricing (2) purchase (2) redlines (2) reference files (2) rental plans (2) shortcuts (2) sketchup (2) status bar (2) technology preview (2) tool pallet (2) tooltips (2) tv (2) units (2) video editing (2) viewer (2) webinar (2) 123D (1) 123D Catch (1) 123D Create (1) 123D Make (1) 2014 (1) 2015 (1) 3d Printing (1) ACAD/Medre.A (1) ADR (1) AEC (1) AUGI World (1) Account (1) Adobe (1) Apps Tab (1) AutoCAD 2016 (1) AutoCAD Error (1) AutoCAD LT 2012 (1) AutoCAD LT 2014 (1) AutoCAD LT 2015 (1) AutoCAD Mechanical (1) AutoCAD Revit Suite (1) Autodesk Account (1) Autodesk BIM 360 (1) Autodesk Instant (1) Autodesk PLM 360 (1) Autodesk ReCap (1) Award (1) CADDork (1) CADO (1) CTB (1) CadMouse (1) Camtasia (1) Communication Center (1) Corel (1) DWFx (1) Dassault Systemes (1) Death Star (1) Dell (1) Design Feed (1) Design Suites (1) DesignCAD (1) DoubleCAD (1) Duratec (1) E32 (1) ESET (1) ESRI (1) EliteBook (1) Epson (1) Evernote (1) Exchange Apps (1) FTP (1) ForceEffect (1) Free Form (1) Fusion 360 (1) GIS Day (1) GeoViewer (1) Geographic Information Systems (1) Geographic Location (1) Google Chromebook Pixel (1) Google Earth (1) Google Earth Pro (1) HP Designjet T2300 eMFP (1) HP EliteBook (1) HP EliteBook 8570w (1) HP Z1 (1) Help (1) Homestyler (1) IT (1) Infocenter (1) Inforbix (1) InfraWorks (1) InfraWorks 360 Pro (1) Infrastructure Modeler (1) Instant (1) Inventor 2013 (1) Inventor 2013 SP1 (1) Inventor LT (1) JPEG 2000 (1) Kickstarter (1) Kindle (1) Language packs (1) Lawsuit (1) Lenovo Thinkstation E32 (1) LizardTech (1) MS Exchange (1) Map 3D (1) Maya (1) MrSID (1) OS (1) OS X (1) Office Suite (1) Orange Juice Studios (1) P-Series (1) PLM (1) Photoshop (1) Pixel (1) Pixlr (1) Pixlr Express (1) Pixlr-o-matic (1) Plant (1) PogoPlug (1) Point Cloud (1) Previous (1) Project Artoo (1) Project Geppetto (1) Project Snap (1) R&D (1) Red Dot Award (1) Review-Service (1) Revit (1) Revit LT 2013 (1) Rhino (1) SDK (1) SMS (1) Secureload (1) Socialcam (1) Softimage (1) Solid Edge (1) SolidWorks (1) SpaceMouse Wireless (1) SpaceNavigator (1) Star Wars (1) SureColor (1) T-Series (1) TechSmith (1) The Future (1) Thinkstation E32 (1) Touch Screen (1) Trimble (1) TurboSite (1) TurboSite Reader (1) TurboViewer Pro (1) Unreconciled Layers (1) VBA (1) VOIP (1) Vault (1) Vault 2012 (1) Vela Systems (1) Visualization (1) WebOS (1) Welcome Screen (1) Windows Vista (1) Windows XP (1) Z1 (1) acad.doc (1) acad.lsp (1) acaddoc.lsp (1) acquisition (1) advice (1) aerial (1) all-in-one (1) angles (1) archive (1) arcs (1) author (1) autocad 2012. autocad lt 2012 (1) autocad. autocad for mac (1) autodesk logo (1) background (1) break (1) burrito (1) business (1) celebrate (1) check (1) checklist (1) chrome (1) chrome os (1) chromebook (1) climate (1) coming soon (1) communicate (1) constraints (1) construction (1) copier (1) crowd funding (1) customize (1) deadlines (1) design process (1) designer (1) desktop subscription (1) different language (1) draftsight (1) eMFP (1) ePrint (1) employee (1) employer (1) engineer (1) environment (1) event (1) feeds (1) file sharing (1) filepath (1) fix it (1) folders (1) font (1) government fail (1) groups (1) guide (1) hatching (1) imagery (1) initial setup (1) input (1) install (1) intel (1) internet (1) investment (1) isometrics (1) labels (1) layer manager (1) linetype (1) livestream (1) logo (1) macro (1) malware (1) message (1) mice (1) model space (1) modeling (1) multi leaders (1) navigation (1) newsletter (1) notifications (1) offset (1) opinion (1) options (1) overrides status bar (1) parametrics (1) patches (1) pay-as-you-go (1) perpetual license (1) podcast (1) poll (1) polyline (1) prank (1) printer failure (1) printers color (1) project draw (1) project files (1) project workflow (1) questions (1) recommend (1) release (1) remove (1) rent (1) repair (1) resume (1) reverse line direction (1) right click (1) save (1) scale (1) scanner (1) screen capture (1) sea turtles (1) send files (1) settings (1) snap (1) software (1) solutions (1) sony (1) student (1) subscription center (1) sustainability (1) system variables (1) tabs (1) tech snob (1) transparency (1) trial (1) undo (1) uninstall (1) viewports (1) virus (1) webcast (1) wiki (1) workplace (1)